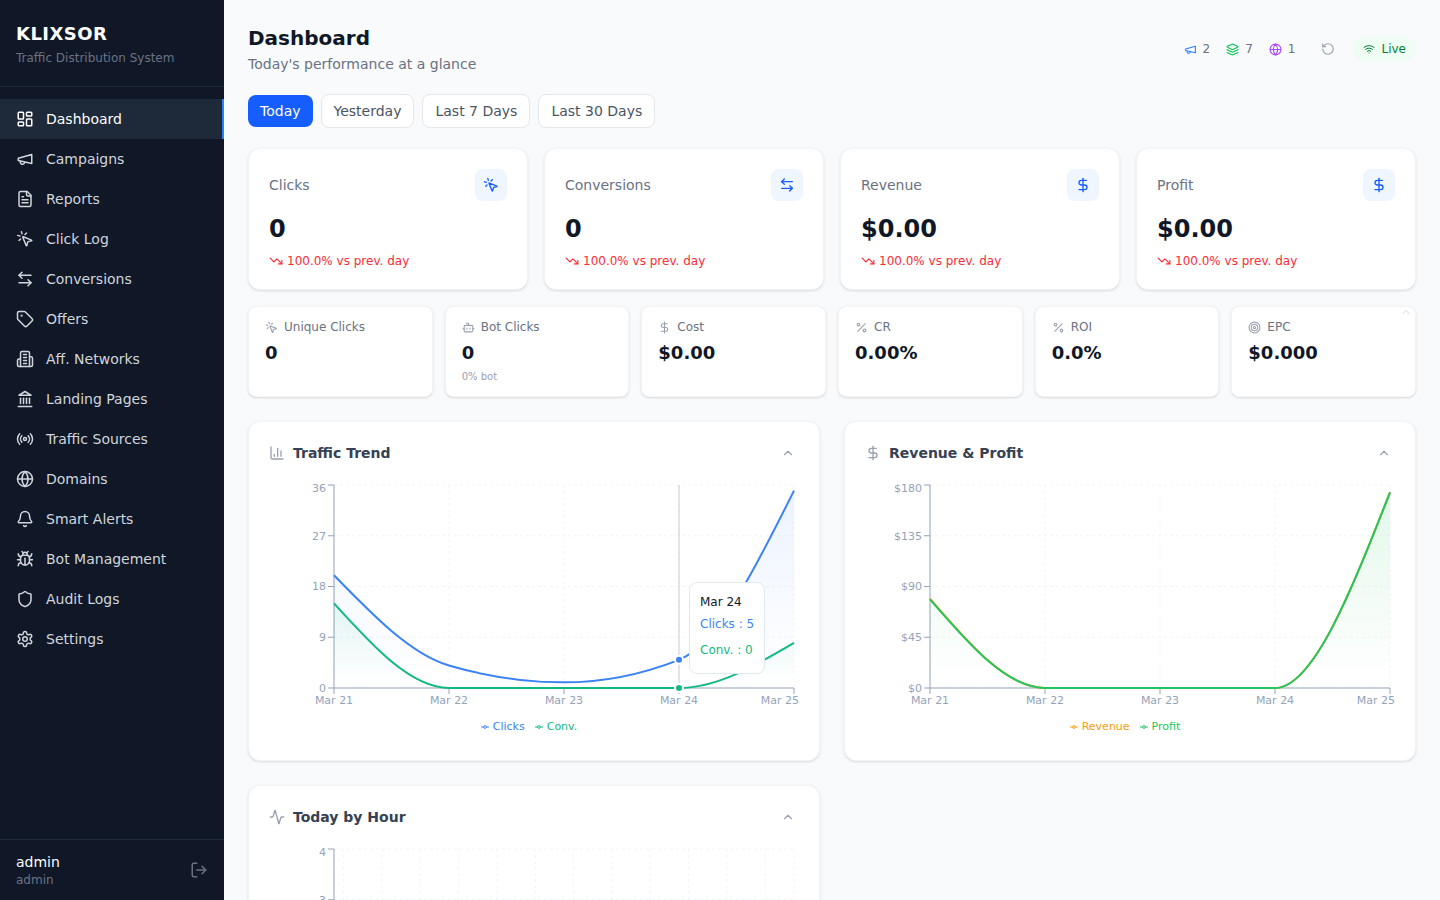
Quick Start
Get Klixsor running on your server in under 5 minutes.
Get a VPS
Provision a fresh Ubuntu 22.04 or Debian 12 server from any provider (Contabo, Hetzner, DigitalOcean, Vultr, OVH, etc). See server requirements below.
Run the installer
SSH into your server as root and run:
curl -sSL https://klixsor.com/install.sh | bash -s -- YOUR-LICENSE-KEYReplace YOUR-LICENSE-KEY with the license key from your purchase email. The installer handles everything — Docker, databases, binaries, firewall, and bot IP list seeding.
Save your credentials
When the installer finishes, it prints your admin login, password, and server URL. It also saves them to /opt/klixsor/credentials.txt.
Log in and configure
Open http://YOUR-SERVER-IP:8081 in your browser. Log in with the admin credentials. Add your tracking domain, create your first campaign, and you're live.
Server Requirements
| Component | Minimum | Recommended |
|---|---|---|
| OS | Ubuntu 20.04 / Debian 11 | Ubuntu 22.04 / Debian 12 |
| CPU | 2 vCPU | 4+ vCPU |
| RAM | 4 GB | 8+ GB |
| Storage | 40 GB SSD | 80+ GB NVMe SSD |
| Bandwidth | 1 TB/month | Unlimited / 5+ TB |
Ports Used
| Port | Service | Access |
|---|---|---|
| 22 | SSH | Public (your IP only recommended) |
| 80 | HTTP | Public |
| 443 | HTTPS | Public |
| 8081 | Admin API | Localhost only (behind Nginx) |
| 8090 | Click Engine | Localhost only (behind Nginx) |
| 5432 | PostgreSQL | Localhost only |
| 9000 | Analytics Engine | Localhost only |
| 6379 | Redis | Localhost only |
Installation
What the installer does
- Installs system dependencies (curl, Docker, fail2ban, UFW)
- Sets up Docker containers for PostgreSQL 16, analytics engine, and Redis 7
- Downloads Klixsor API and Click Engine binaries
- Runs database migrations
- Creates an admin user with a random password
- Configures systemd services for auto-start on boot
- Sets up UFW firewall (ports 22, 80, 443 only)
- Seeds 17 bot IP lists and triggers initial sync
Installation command
curl -sSL https://klixsor.com/install.sh | bash -s -- YOUR-LICENSE-KEYCustom version
To install a specific version instead of the latest:
curl -sSL https://klixsor.com/install.sh | bash -s -- --version 1.2.0 YOUR-LICENSE-KEYFile locations
| Path | Contents |
|---|---|
/opt/klixsor/ | Binaries, config, license key, docker-compose |
/opt/klixsor/configs/config.yaml | Main configuration file |
/opt/klixsor/.env | Database passwords, JWT secret, license key |
/opt/klixsor/credentials.txt | Generated credentials (readable by root only) |
/opt/klixsor/license.key | Your license key |
/var/lib/klixsor/ | Database data (PostgreSQL, analytics engine, Redis) |
/var/lib/klixsor/backups/ | Automatic pre-update backups |
First Steps After Install
- Log in — Open
http://YOUR-SERVER-IP/api/v1/auth/loginwith the credentials from the installer output - Add a tracking domain — Go to Domains → Add Domain. Point your domain's DNS A record to your server IP first.
- Set up SSL — Click the shield icon (Setup SSL) on your domain row. This auto-provisions a Let's Encrypt certificate — no manual certbot commands needed.
- Create a traffic source — Define where your traffic comes from. Choose from 33 built-in templates covering all major ad platforms (Facebook, Google, TikTok, Microsoft, Snapchat, Pinterest, Twitter/X, LinkedIn, Reddit, Taboola, Outbrain, and 20+ push/native/adult networks) with pre-configured URL parameters
- Add offers — Add the affiliate offers you want to route traffic to
- Create a campaign — Set up your first campaign with flows, landing pages, and offers
- Verify bot detection — Check Bot Management → IP Lists to confirm all lists are synced
- Configure GeoIP — Go to Settings → GeoIP Databases and enter your MaxMind Account ID and License Key, then download the databases. See GeoIP Databases for full setup instructions. This is required for country/city tracking.
- Check Settings — Go to Settings in the sidebar to verify your license status, version, and usage limits
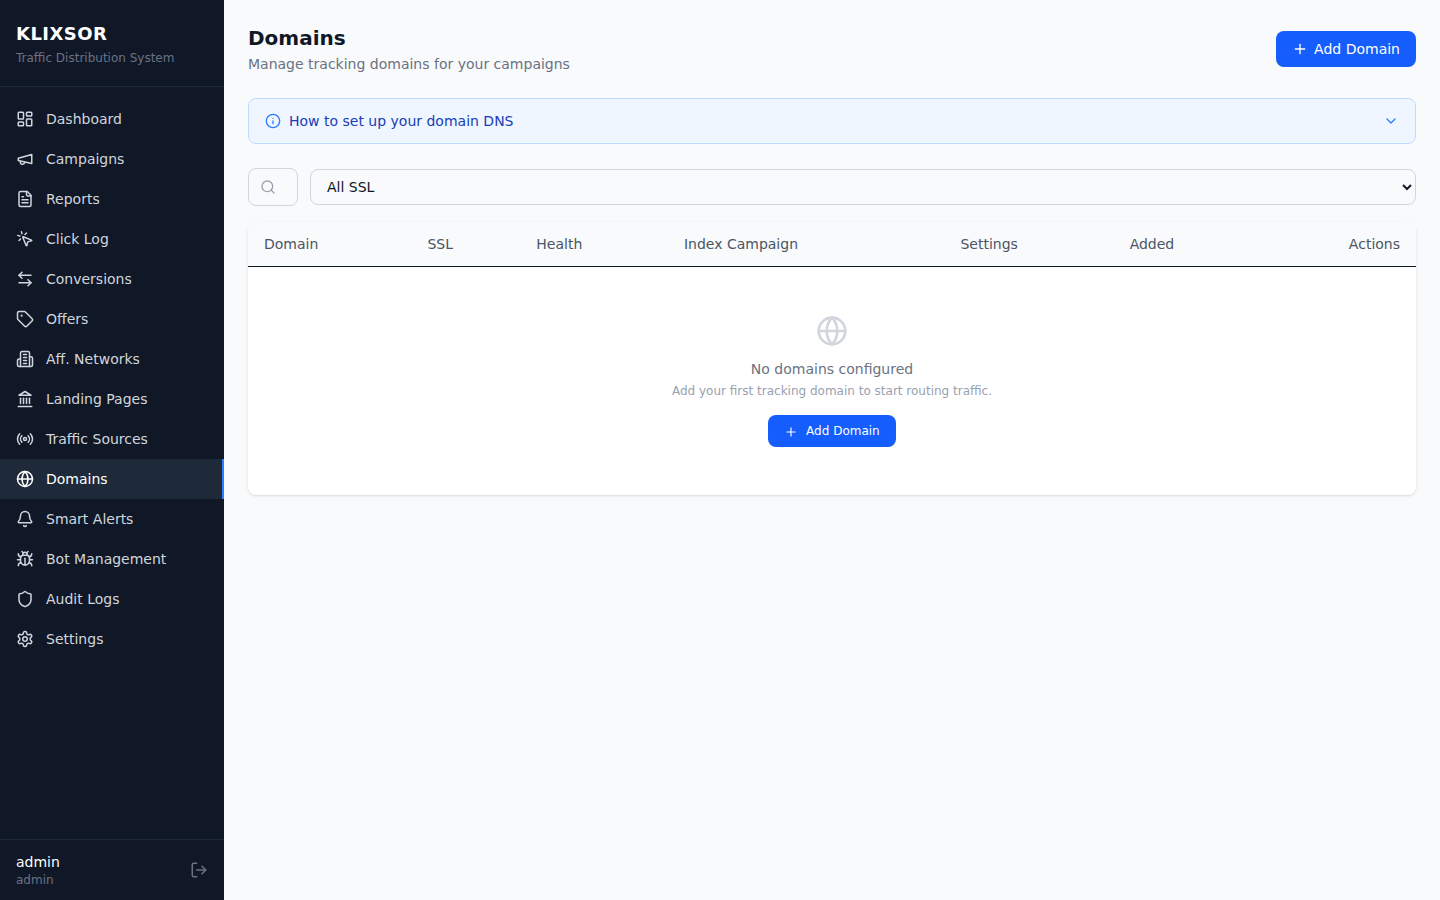
Adding Domains
Adding a tracking domain to Klixsor is a 3-step process: configure DNS, add the domain in the admin panel, then provision SSL.
Step 1: Configure DNS
In your domain registrar (Namecheap, Cloudflare, GoDaddy, etc.), create a DNS record pointing to your Klixsor server.
For subdomains (recommended — e.g., track.yourdomain.com):
Type: A (or CNAME)
Name: track
Value: YOUR-SERVER-IP
TTL: 300 (or Auto)
For root domains (e.g., yourdomain.com):
Type: A
Name: @
Value: YOUR-SERVER-IP
TTL: 300 (or Auto)
Your server's IP is shown in the admin panel — the Domains page displays DNS setup instructions with the correct IP pre-filled.
Step 2: Add the domain in Klixsor
- Go to Domains → Add Domain
- Enter the full domain name (e.g.,
track.yourdomain.com) - Optionally set an Index Campaign to handle visitors to the domain root
- Save the domain
Step 3: Setup SSL
Click the shield icon (Setup SSL) on the domain row. Klixsor will automatically:
- Verify DNS is pointing to your server
- Create an Nginx server block for the domain
- Provision a free Let's Encrypt SSL certificate
- Configure HTTPS with automatic HTTP → HTTPS redirect
The entire process takes about 10 seconds. Once complete, the SSL column will show Enabled.
SSL / HTTPS Setup
SSL is critical for tracking domains. Without HTTPS, browsers will show security warnings and may block redirects and tracking pixels.
Automatic SSL (recommended)
Klixsor handles SSL automatically. When you click the Setup SSL button on a domain, it:
- Creates an Nginx server block for the domain
- Obtains a free Let's Encrypt certificate via
certbot - Configures HTTPS with automatic HTTP → HTTPS redirect
- Sets up automatic certificate renewal (via systemd timer)
No manual configuration required. The installer pre-installs Nginx and Certbot for you.
Manual SSL (advanced)
If you prefer manual control, you can provision certificates yourself:
# Get a certificate manually
certbot certonly --nginx -d track.yourdomain.com

# Or use standalone mode (stops nginx temporarily)
certbot certonly --standalone -d track.yourdomain.com

# Certificates renew automatically via systemd timer
systemctl list-timers | grep certbot
Cloudflare (if using Cloudflare DNS)
Set Cloudflare SSL mode to Full (Strict) and use Cloudflare's origin certificate.
Nginx Reverse Proxy
Nginx is installed and configured automatically by the Klixsor installer. It proxies HTTPS traffic to the Klixsor services running on localhost.
How it works
The installer creates a base Nginx config at /etc/nginx/sites-available/klixsor-admin that:
- Proxies
/api/requests to the Admin API (:8081) - Proxies all other requests to the Click Engine (
:8090)
When you click Setup SSL on a domain, Klixsor creates a dedicated Nginx config at /etc/nginx/sites-available/klixsor-trk-{domain} with SSL termination.
Config files
# Base config (created by installer)
/etc/nginx/sites-available/klixsor-admin

# Per-domain configs (created by Setup SSL)
/etc/nginx/sites-available/klixsor-trk-track.yourdomain.com

# Check all configs
nginx -t

# Reload after manual changes
systemctl reload nginx
Custom Nginx config (advanced)
If you need to customize the Nginx config for a domain (e.g., add custom headers, rate limiting), edit the per-domain config file directly:
# Edit the tracking domain config
nano /etc/nginx/sites-available/klixsor-trk-track.yourdomain.com

# Test and reload
nginx -t && systemctl reload nginxGeoIP Databases
Configure MaxMind GeoLite2 databases for accurate country, city, and ISP detection on every click.
Why MaxMind credentials are needed
MaxMind now requires users to create a free account and use their own credentials to download GeoLite2 databases. This is a licensing change from MaxMind — the databases are still free, but you need an account to access them. Without GeoIP databases, Klixsor cannot determine visitor location, ISP, or connection type.
Step 1: Create a free MaxMind account
- Go to maxmind.com/en/geolite2/signup
- Fill out the registration form (name, email, company optional)
- Verify your email and set a password
- Log into your MaxMind account dashboard
Step 2: Generate a license key
- In your MaxMind account, go to Manage License Keys (under Services)
- Click Generate New License Key
- Give it a description (e.g., "Klixsor") and confirm
- Copy the Account ID and License Key — the license key is shown only once
Step 3: Configure in Klixsor
- Go to Settings → GeoIP Databases
- Click Configure MaxMind
- Enter your MaxMind Account ID and License Key
- Click Save
- Click Download Databases to fetch GeoLite2-City and GeoLite2-ASN
The download typically takes 10-30 seconds depending on your server's internet speed. Both databases are required for full geolocation and ISP detection.
Notification banner
If GeoIP databases are not configured, Klixsor displays a notification banner at the top of the dashboard after login. This banner appears on every page until you configure and download the databases. Once configured, the banner disappears automatically.
Databases used
| Database | Purpose | Data provided |
|---|---|---|
| GeoLite2-City | Location detection | Country, region/state, city, latitude/longitude, timezone |
| GeoLite2-ASN | Network detection | ISP name, ASN number, organization, connection type |
Configuration File
The main configuration is at /opt/klixsor/configs/config.yaml. Here are the key sections:
server:
  api_port: 8081          # Admin API port
  click_port: 8090        # Click engine port
  server_ip: ""           # Auto-detected if empty

postgres:
  host: localhost
  port: 5432
  user: klixsor
  password: "your-password"
  database: klixsor
  max_conns: 20           # Connection pool size

clickhouse:
  host: localhost
  port: 9000
  database: klixsor

redis:
  addr: localhost:6379
  password: "your-password"
  db: 0

bot_detect:
  score_threshold: 70     # Score >= 70 = definite bot (blocked)
  challenge_threshold: 40 # Score 40-69 = suspicious (challenge page)

geoip:
db_path: "/var/lib/klixsor/GeoLite2-City.mmdb"systemctl restart klixsor-api klixsor-clickengineCreating Campaigns
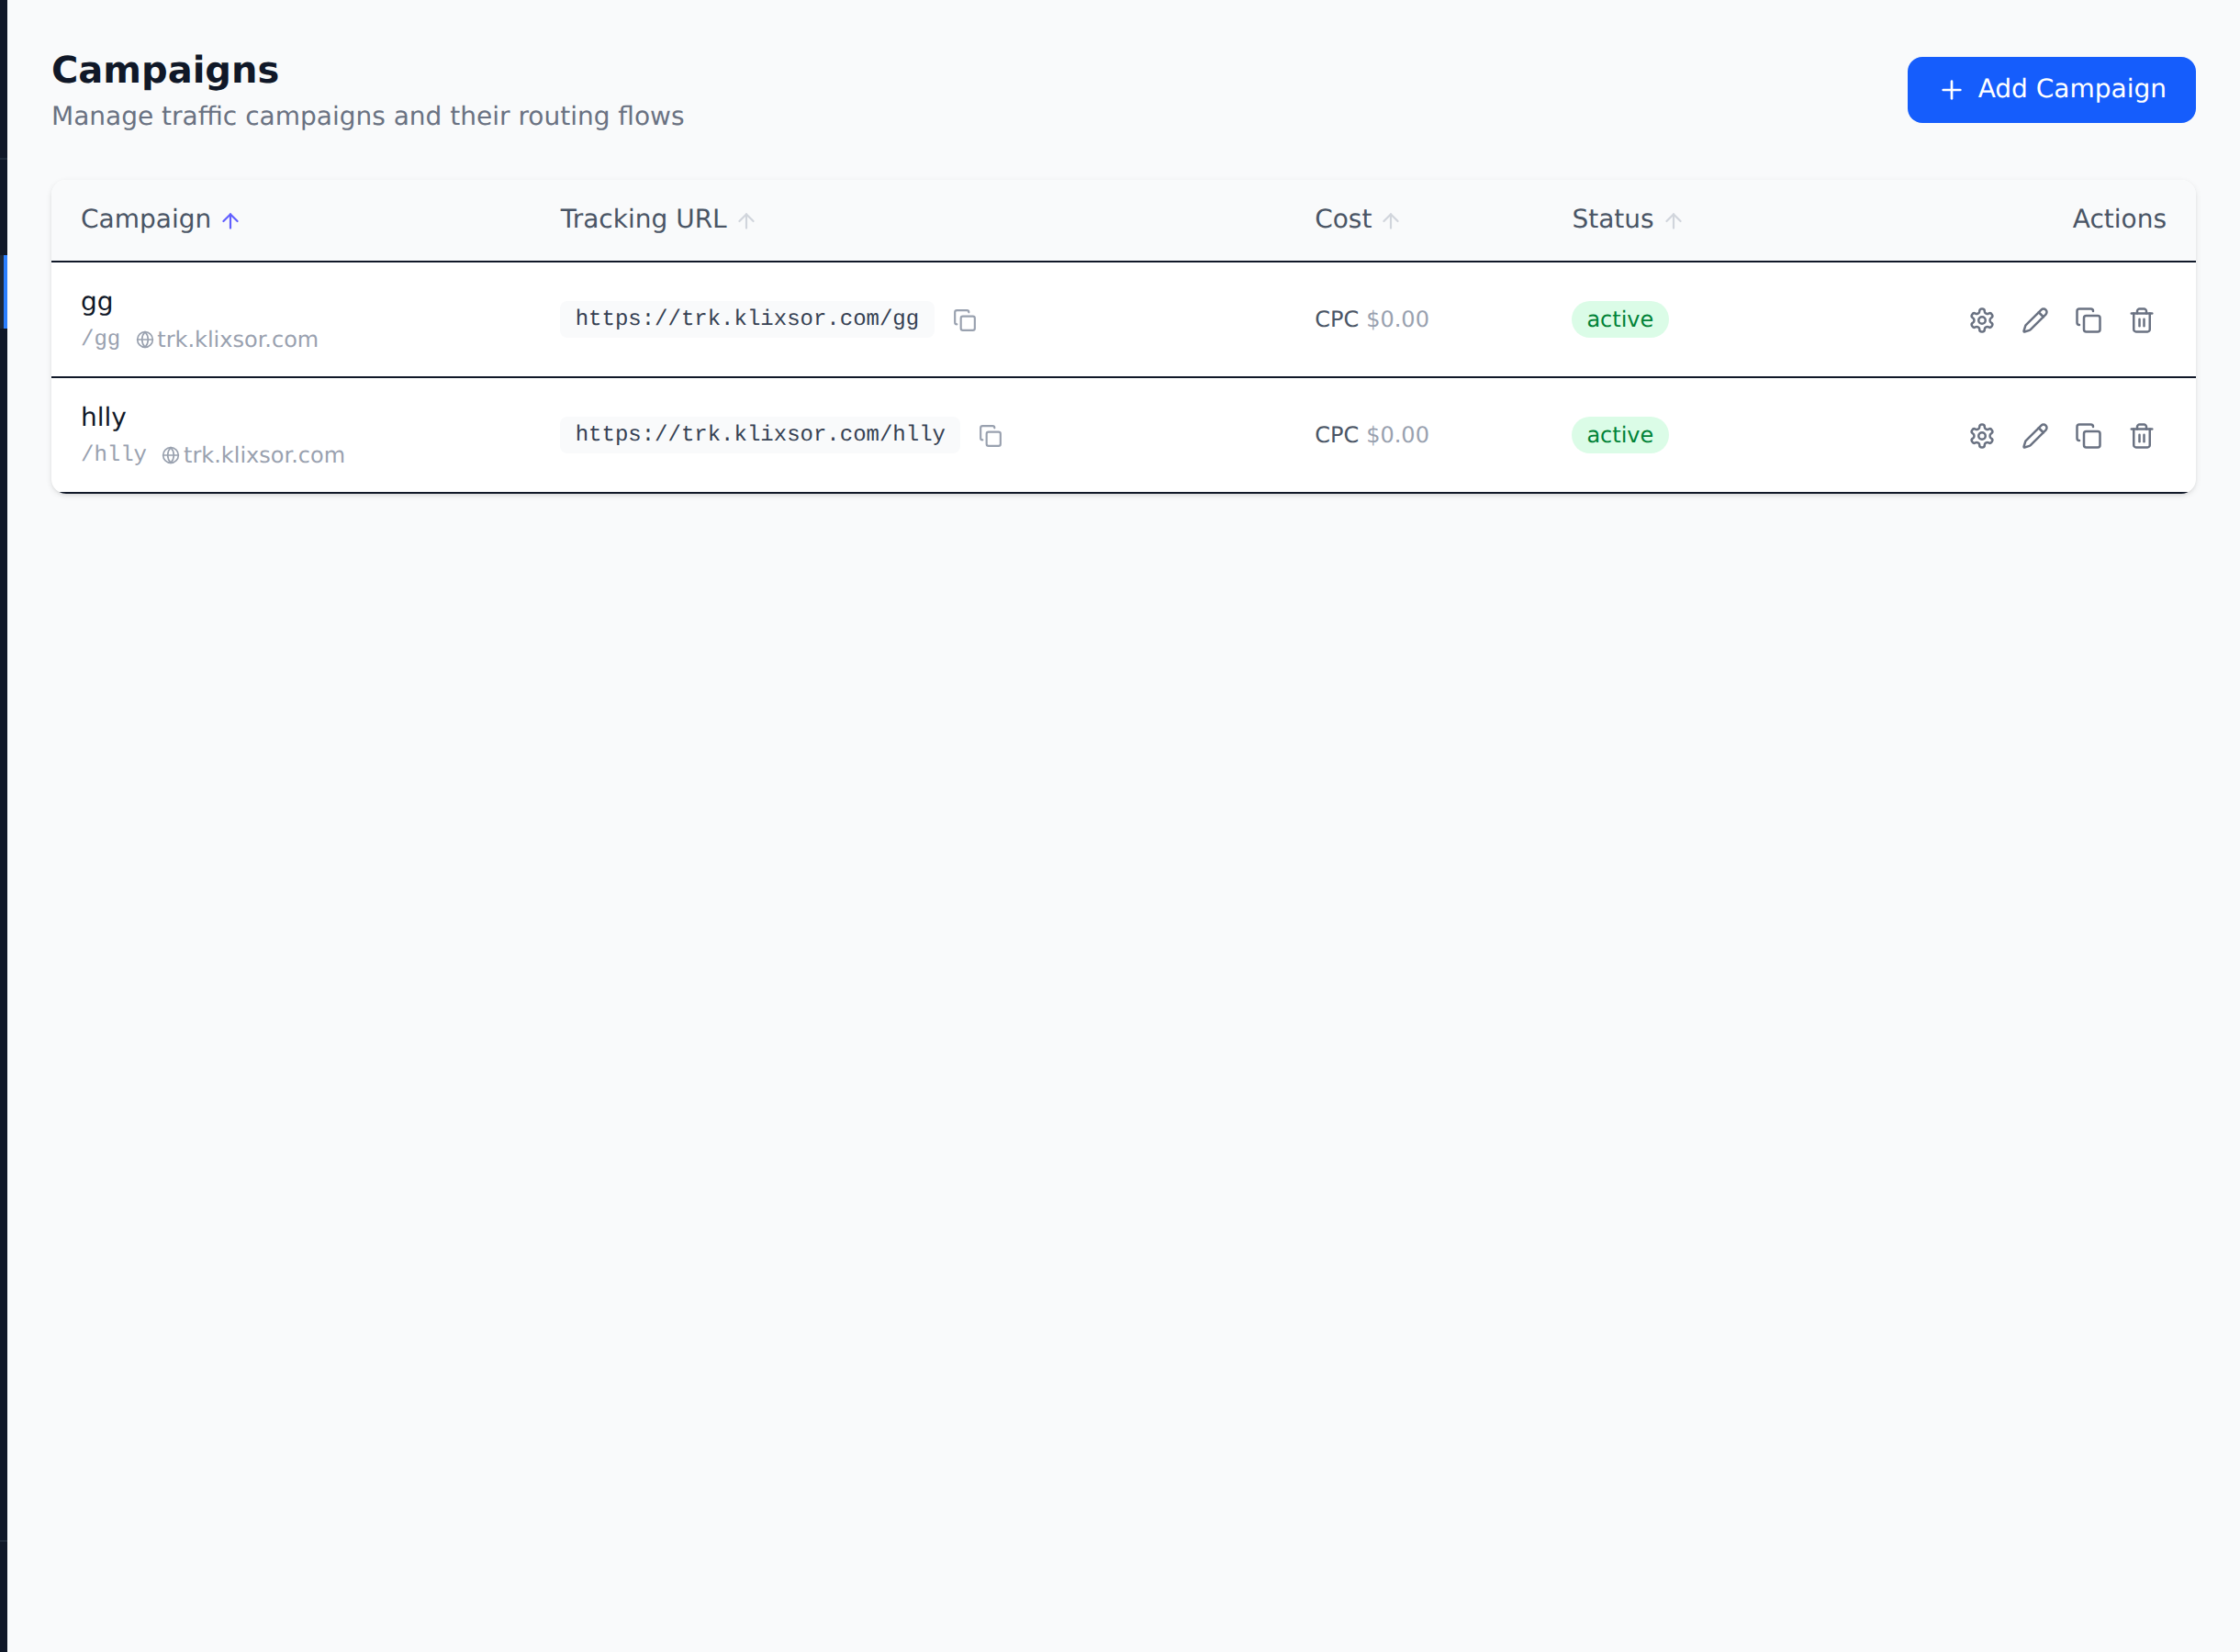
Campaigns are the core of Klixsor. Each campaign has a unique URL that receives traffic and routes it based on your configured flows.
Campaign URL structure
https://track.yourdomain.com/CAMPAIGN-ALIAS?sub_id_1=value&sub_id_2=valueCampaign settings
| Setting | Description |
|---|---|
| Alias | URL slug for the campaign (e.g., my-offer) |
| Domain | Which tracking domain to use |
| Traffic Source | Where traffic originates — choose from 33 built-in templates or create a custom source. CAPI-capable sources (Meta, Google, TikTok, Microsoft) support server-side conversion forwarding. |
| Cost Model | CPC, CPM, CPA, or Revenue Share |
| Uniqueness | How to count unique clicks (by IP, cookie, or both) |
| Safe Page | What to show bots/moderators (disabled, redirect, HTML, or proxy) |

Flows & Routing
Each campaign contains one or more flows. Flows determine which landing page and offer a visitor sees based on conditions you define.
Flow types
- Forced flow — Always used when its conditions match (top priority)
- Regular flow — Selected by weight among eligible flows
- Default flow — Fallback when no other flow matches
Flow conditions
Route traffic based on: country, device, OS, browser, language, connection type, ISP, referrer, sub ID values, day of week, hour of day, and more.
Landing Pages
Klixsor supports two types of landing pages:
Redirect landing pages
Klixsor redirects the visitor to your externally hosted landing page URL. The click URL is appended as a parameter so your page can link to the offer.
Local (hosted) landing pages
HTML stored and served directly by Klixsor. Use the Clone from URL feature to import any page:
- Click "Clone from URL" in the Landing Pages section
- Paste the URL of the page you want to clone
- Klixsor fetches the HTML, downloads all assets (images, CSS, JS, fonts) locally, and rewrites URLs so the page is fully self-contained
- Edit the page with the built-in visual editor or raw HTML to add
{offer_url}placeholders in your CTA buttons
Visual Editor
Local landing pages can be edited with the built-in WYSIWYG visual editor (powered by GrapeJS). Click the paintbrush icon on any local landing page to open it.
- Drag-and-drop blocks — text, images, links, videos, columns, sections, dividers, and more
- Style manager — typography, layout, borders, backgrounds, spacing
- Device preview — desktop, tablet, and mobile views
- Code editor — switch to raw HTML/CSS when needed
- Tracking placeholders — insert
{click_id},{offer_url}via dropdown - Undo/redo with dirty-state tracking so you never lose changes
Asset cloning
When you clone a page, Klixsor downloads all referenced assets (images, stylesheets, scripts, fonts) to local storage. This means:
- Your cloned page works even if the original source goes down
- Page load times are faster since assets are served from your own server
- CSS files are processed recursively — fonts and images referenced inside CSS are also downloaded
Re-clone & asset management
Cloned pages have two additional actions in the landing page list:
- Re-clone (refresh icon) — re-fetches the page from the original source URL, downloads fresh assets, and updates the stored HTML. Useful to pick up changes from the source.
- Manage assets (hard drive icon) — shows the number of downloaded files and total disk usage. You can clear all assets to free disk space. After clearing, images and styles will attempt to load from the original source URLs. Re-clone to download them again.
Available placeholders
| Placeholder | Replaced with |
|---|---|
{click_id} | Unique click identifier |
{offer_url} | Selected offer URL (for CTA links) |
{country} | Visitor's country code (US, GB, etc) |
{city} | Visitor's city name |
{device} | Device type (desktop, mobile, tablet) |
{os} | Operating system |
{browser} | Browser name |
{ip} | Visitor's IP address |
{sub_id_1} ... {sub_id_30} | Custom sub ID values |
Offers
Offers are the destination URLs where traffic is ultimately sent. Add your affiliate offer URLs with the appropriate tracking parameters.
Offer URL with macros
https://network.com/offer?click_id={click_id}&sub1={sub_id_1}&sub2={sub_id_2}Klixsor replaces all {placeholder} tokens with actual values when redirecting the visitor.
Affiliate network presets
When creating an offer, select from 36 built-in affiliate network presets that pre-fill the postback URL format and conversion tracking parameters. Supported networks include:
- CPA Networks: MaxBounty, ClickDealer, Mobidea, Golden Goose, Zeydoo, Adcombo, Clickbooth, ClickBank, CJ Affiliate, A4D, Leadbit, Dr.Cash, Alfaleads, Everad, LosPollos, Toro Advertising, MyLead, CrakRevenue, Adscend Media
- Affiliate Platforms: ShareASale, FlexOffers, Pepperjam/Ascend, Digistore24, JVZoo, WarriorPlus
- Ad Network CPA: Adsterra, PropellerAds CPA
- Custom: Enter any network's postback URL manually
Conversion Tracking
Track conversions by adding a postback URL to your affiliate network. When a conversion happens, the network sends a request to Klixsor with the click ID.
Postback URL format
https://track.yourdomain.com/postback?click_id={click_id}&payout={payout}&status=approvedReplace {click_id} and {payout} with your network's corresponding macros.
Conversion parameters
| Parameter | Required | Description |
|---|---|---|
click_id | Yes | The Klixsor click ID that was passed to the offer |
payout | No | Revenue amount (e.g., 2.50) |
status | No | approved, pending, or rejected (default: approved) |
transaction_id | No | External transaction/conversion ID |
Conversion API (CAPI)
Server-side conversion forwarding to ad platforms. Send conversion data directly from your server to Meta, Google Ads, TikTok, and Microsoft Ads — bypassing browser limitations and ad blockers.
Why CAPI matters
In the post-iOS 14 world, browser-based tracking (pixels, cookies) is increasingly unreliable. Ad blockers, ITP, and privacy restrictions can prevent conversion pixels from firing. Server-side conversion forwarding (CAPI) solves this by sending conversion events directly from Klixsor to the ad platform's API in real-time, ensuring your optimization data is complete and accurate.
How to set it up
- Select a CAPI-capable traffic source template — When creating or editing a Traffic Source, choose one of the four supported templates: Facebook Ads, Google Ads, TikTok Ads, or Microsoft Ads
- Expand the "Conversion API (CAPI)" section — Below the URL parameters, you'll see a collapsible CAPI configuration panel
- Enter your platform credentials — Each platform requires different authentication details (see below)
- Save the traffic source — CAPI is now active for all campaigns using this traffic source
- Conversions are forwarded automatically — When a postback fires for a click from this traffic source, Klixsor sends the conversion event to the platform API in real-time
Platform-specific setup
Meta / Facebook Ads
| Field | Where to find it |
|---|---|
| Pixel ID | Events Manager → Data Sources → select your Pixel → Settings → Pixel ID |
| Access Token | Events Manager → Data Sources → select your Pixel → Settings → Generate Access Token |
| Test Event Code (optional) | Events Manager → Test Events tab → copy the test code (e.g., TEST12345) |
Google Ads
| Field | Where to find it |
|---|---|
| Customer ID | Google Ads dashboard → top-right corner (format: 123-456-7890) |
| Conversion Action ID | Tools & Settings → Conversions → select action → ID in URL |
| OAuth Credentials | Google Cloud Console → APIs → Credentials → OAuth 2.0 Client ID + Secret + Refresh Token |
TikTok Ads
| Field | Where to find it |
|---|---|
| Pixel Code | TikTok Ads Manager → Assets → Events → Web Events → Pixel Code |
| Access Token | TikTok Ads Manager → Assets → Events → Web Events → Settings → Generate Access Token |
Microsoft Ads
| Field | Where to find it |
|---|---|
| UET Tag ID | Microsoft Ads → Tools → UET Tags → select your tag → Tag ID |
Test event codes
Use test event codes to safely verify your CAPI integration without affecting production data. Meta and TikTok both support test modes:
- Meta: Enter the Test Event Code from Events Manager → Test Events. Events sent with this code appear in the Test Events tab only and do not affect ad delivery.
- TikTok: Use the test mode toggle in your pixel settings to verify events before going live.
Remove the test event code when you're ready to go live.
Event mapping
Klixsor automatically maps conversion statuses to platform-specific event names:
| Klixsor Status | Meta | Google Ads | TikTok | Microsoft |
|---|---|---|---|---|
| sale / approved | Purchase | Conversion | CompletePayment | purchase |
| lead | Lead | Conversion | SubmitForm | signup |
| install | Lead | Conversion | Download | install |
Campaign Cloning
Duplicate any campaign with a single click. Cloning copies the entire campaign configuration — including all flows, routing rules, offer/LP assignments, and weights — into a new campaign.
How to clone
In the Campaigns list, click the clone icon (overlapping squares) in the Actions column for any campaign. A new campaign is created instantly with the name "Original Name (copy)" and a unique URL alias.
What gets cloned
- Campaign settings — cost model, uniqueness, rotation method, binding, status
- All flows — bot filters, regular flows, and default fallbacks with their full configuration
- Flow conditions — geo, device, OS, browser, language, and other targeting rules
- Offer & LP assignments — all offers and landing pages with their weights
- Optimization rules — any auto-optimization rules configured on the original campaign
What's NOT cloned
- Click and conversion data (the clone starts fresh with zero stats)
- The URL alias (automatically generated as a unique value)
API
POST /api/v1/campaigns/:id/cloneReturns the full new campaign object with all cloned flows.
Auto-Optimization
Automatically adjust offer and landing page weights based on real performance data. The optimization engine runs in the background, evaluating your ClickHouse analytics to shift traffic toward the best-performing variations.
How it works
- Create an optimization rule on the Optimization tab inside any campaign
- Choose what to optimize: offers or landing pages
- Select the metric to optimize by: CR (conversion rate), EPC (earnings per click), ROI, or revenue
- Choose the action: Adjust weights (proportionally shift traffic) or Pause losers (disable underperformers)
- Set the evaluation interval (how often the engine checks, in minutes) and minimum sample size
- The engine runs automatically and logs every action it takes
Optimization actions
| Action | Behavior |
|---|---|
| Adjust weights | Proportionally increases weight on the best-performing variation and decreases weight on the worst. Smooth, gradual rebalancing. |
| Pause losers | Sets the weight to 0 on variations performing below the campaign average. Aggressive — removes underperformers entirely. |
Metrics available
| Metric | Description |
|---|---|
| CR | Conversion rate (conversions / clicks) |
| EPC | Earnings per click (revenue / clicks) |
| ROI | Return on investment ((revenue - cost) / cost) |
| Revenue | Total revenue generated |
Viewing logs
Click View Logs to see a chronological history of every optimization action taken — which variation was adjusted, the old and new weights, and the metric values that triggered the change.
API
GET    /api/v1/campaigns/:id/optimization     — list rules
POST   /api/v1/campaigns/:id/optimization     — create rule
PUT    /api/v1/campaigns/:id/optimization/:id — update rule
DELETE /api/v1/campaigns/:id/optimization/:id — delete rule
GET    /api/v1/campaigns/:id/optimization/logs — view logs
LP CTR Tracking
Measure landing page click-through rates by tracking two events: page views and CTA clicks. This tells you how effectively each landing page converts visitors into offer clicks.
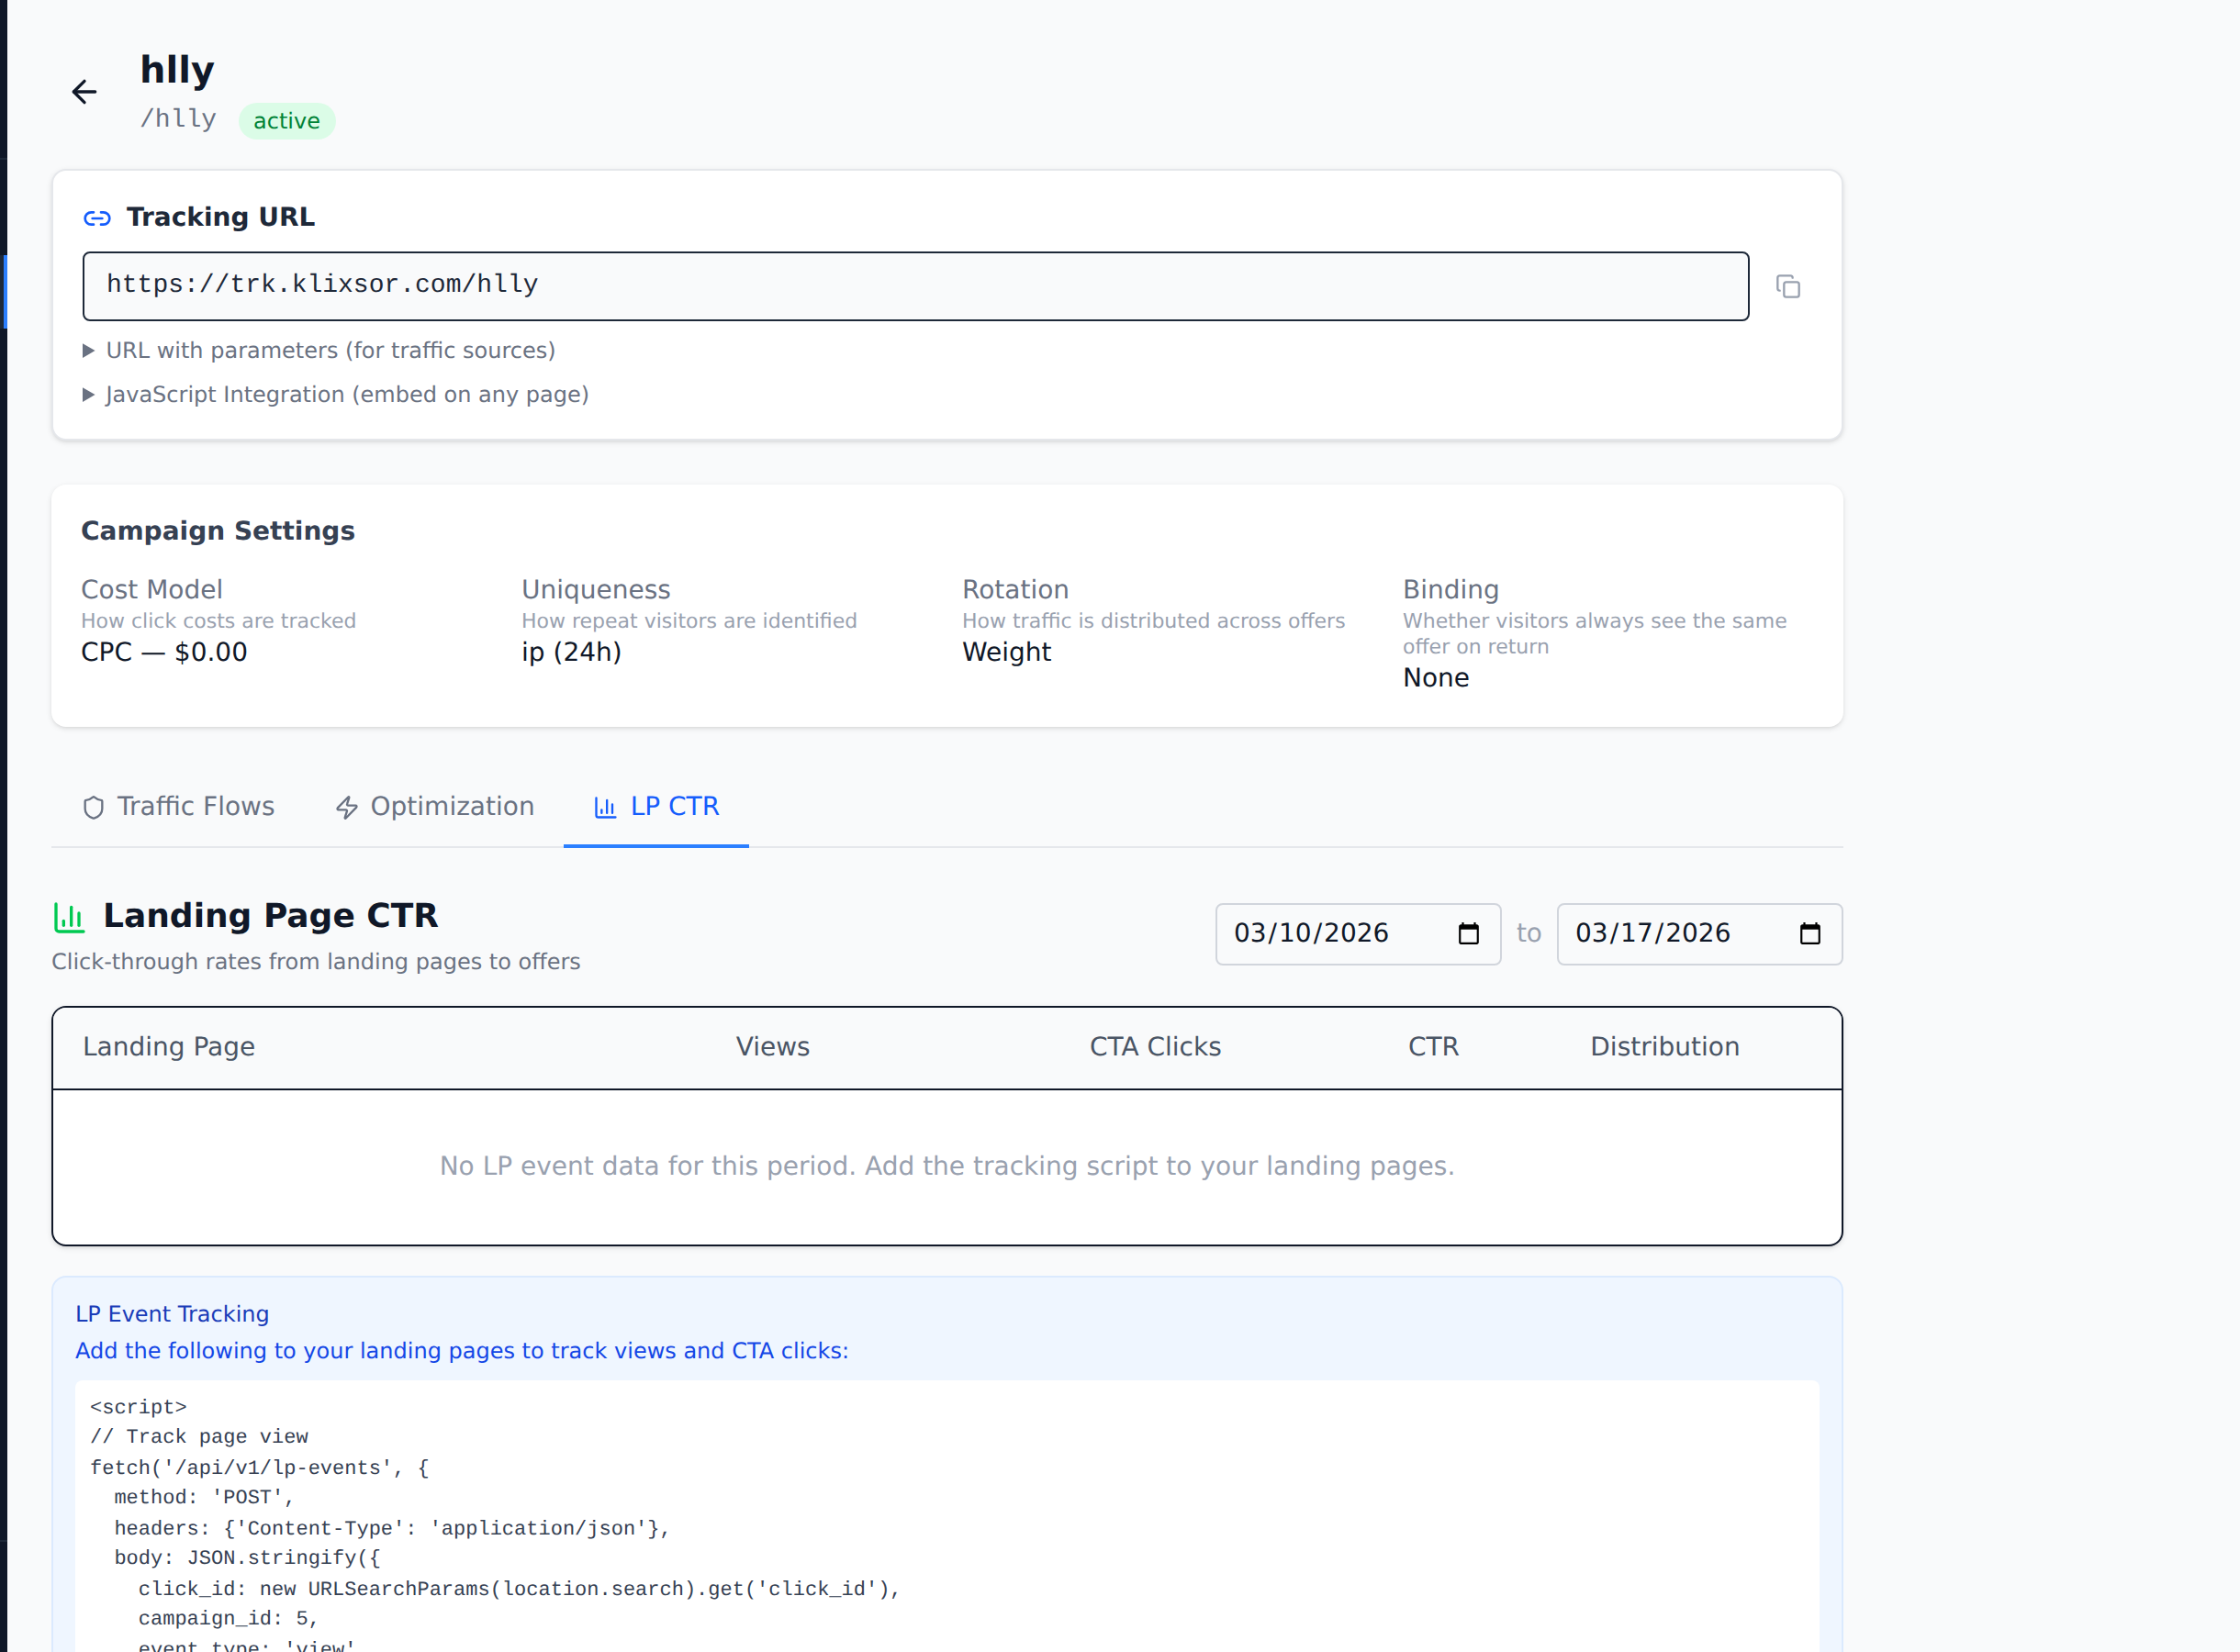
How it works
- Open any campaign and click the LP CTR tab
- Copy the tracking script snippet shown at the bottom
- Add the script to your landing pages — it automatically fires a
viewevent on page load - Add a
cta_clickevent to your CTA button's click handler - View results in the LP CTR tab: views, CTA clicks, CTR%, and distribution chart
Tracking script
The LP CTR tab provides a ready-to-use script. Add it to your landing page's HTML:
<script>
// Track page view
fetch('/api/v1/lp-events', {
  method: 'POST',
  headers: {'Content-Type': 'application/json'},
  body: JSON.stringify({
    click_id: new URLSearchParams(location.search).get('click_id'),
    campaign_id: 5,
    event_type: 'view'
  })
});

// On CTA button click:
function trackCTA() {
  fetch('/api/v1/lp-events', {
    method: 'POST',
    headers: {'Content-Type': 'application/json'},
    body: JSON.stringify({
      click_id: new URLSearchParams(location.search).get('click_id'),
      campaign_id: 5,
      event_type: 'cta_click'
    })
  });
}
</script>
Date range
Use the date picker at the top of the LP CTR tab to filter by time period. The table shows per-landing-page breakdown with a visual distribution bar.
API
POST /api/v1/lp-events                        — track an event
GET  /api/v1/lp-events/ctr?campaign_id=X&date_from=...&date_to=...  — get CTR stats
Smart Alerts
Monitor campaign metrics in real-time and get notified via webhook when thresholds are crossed. Smart Alerts run automatically in the background, checking your analytics data on a configurable schedule.
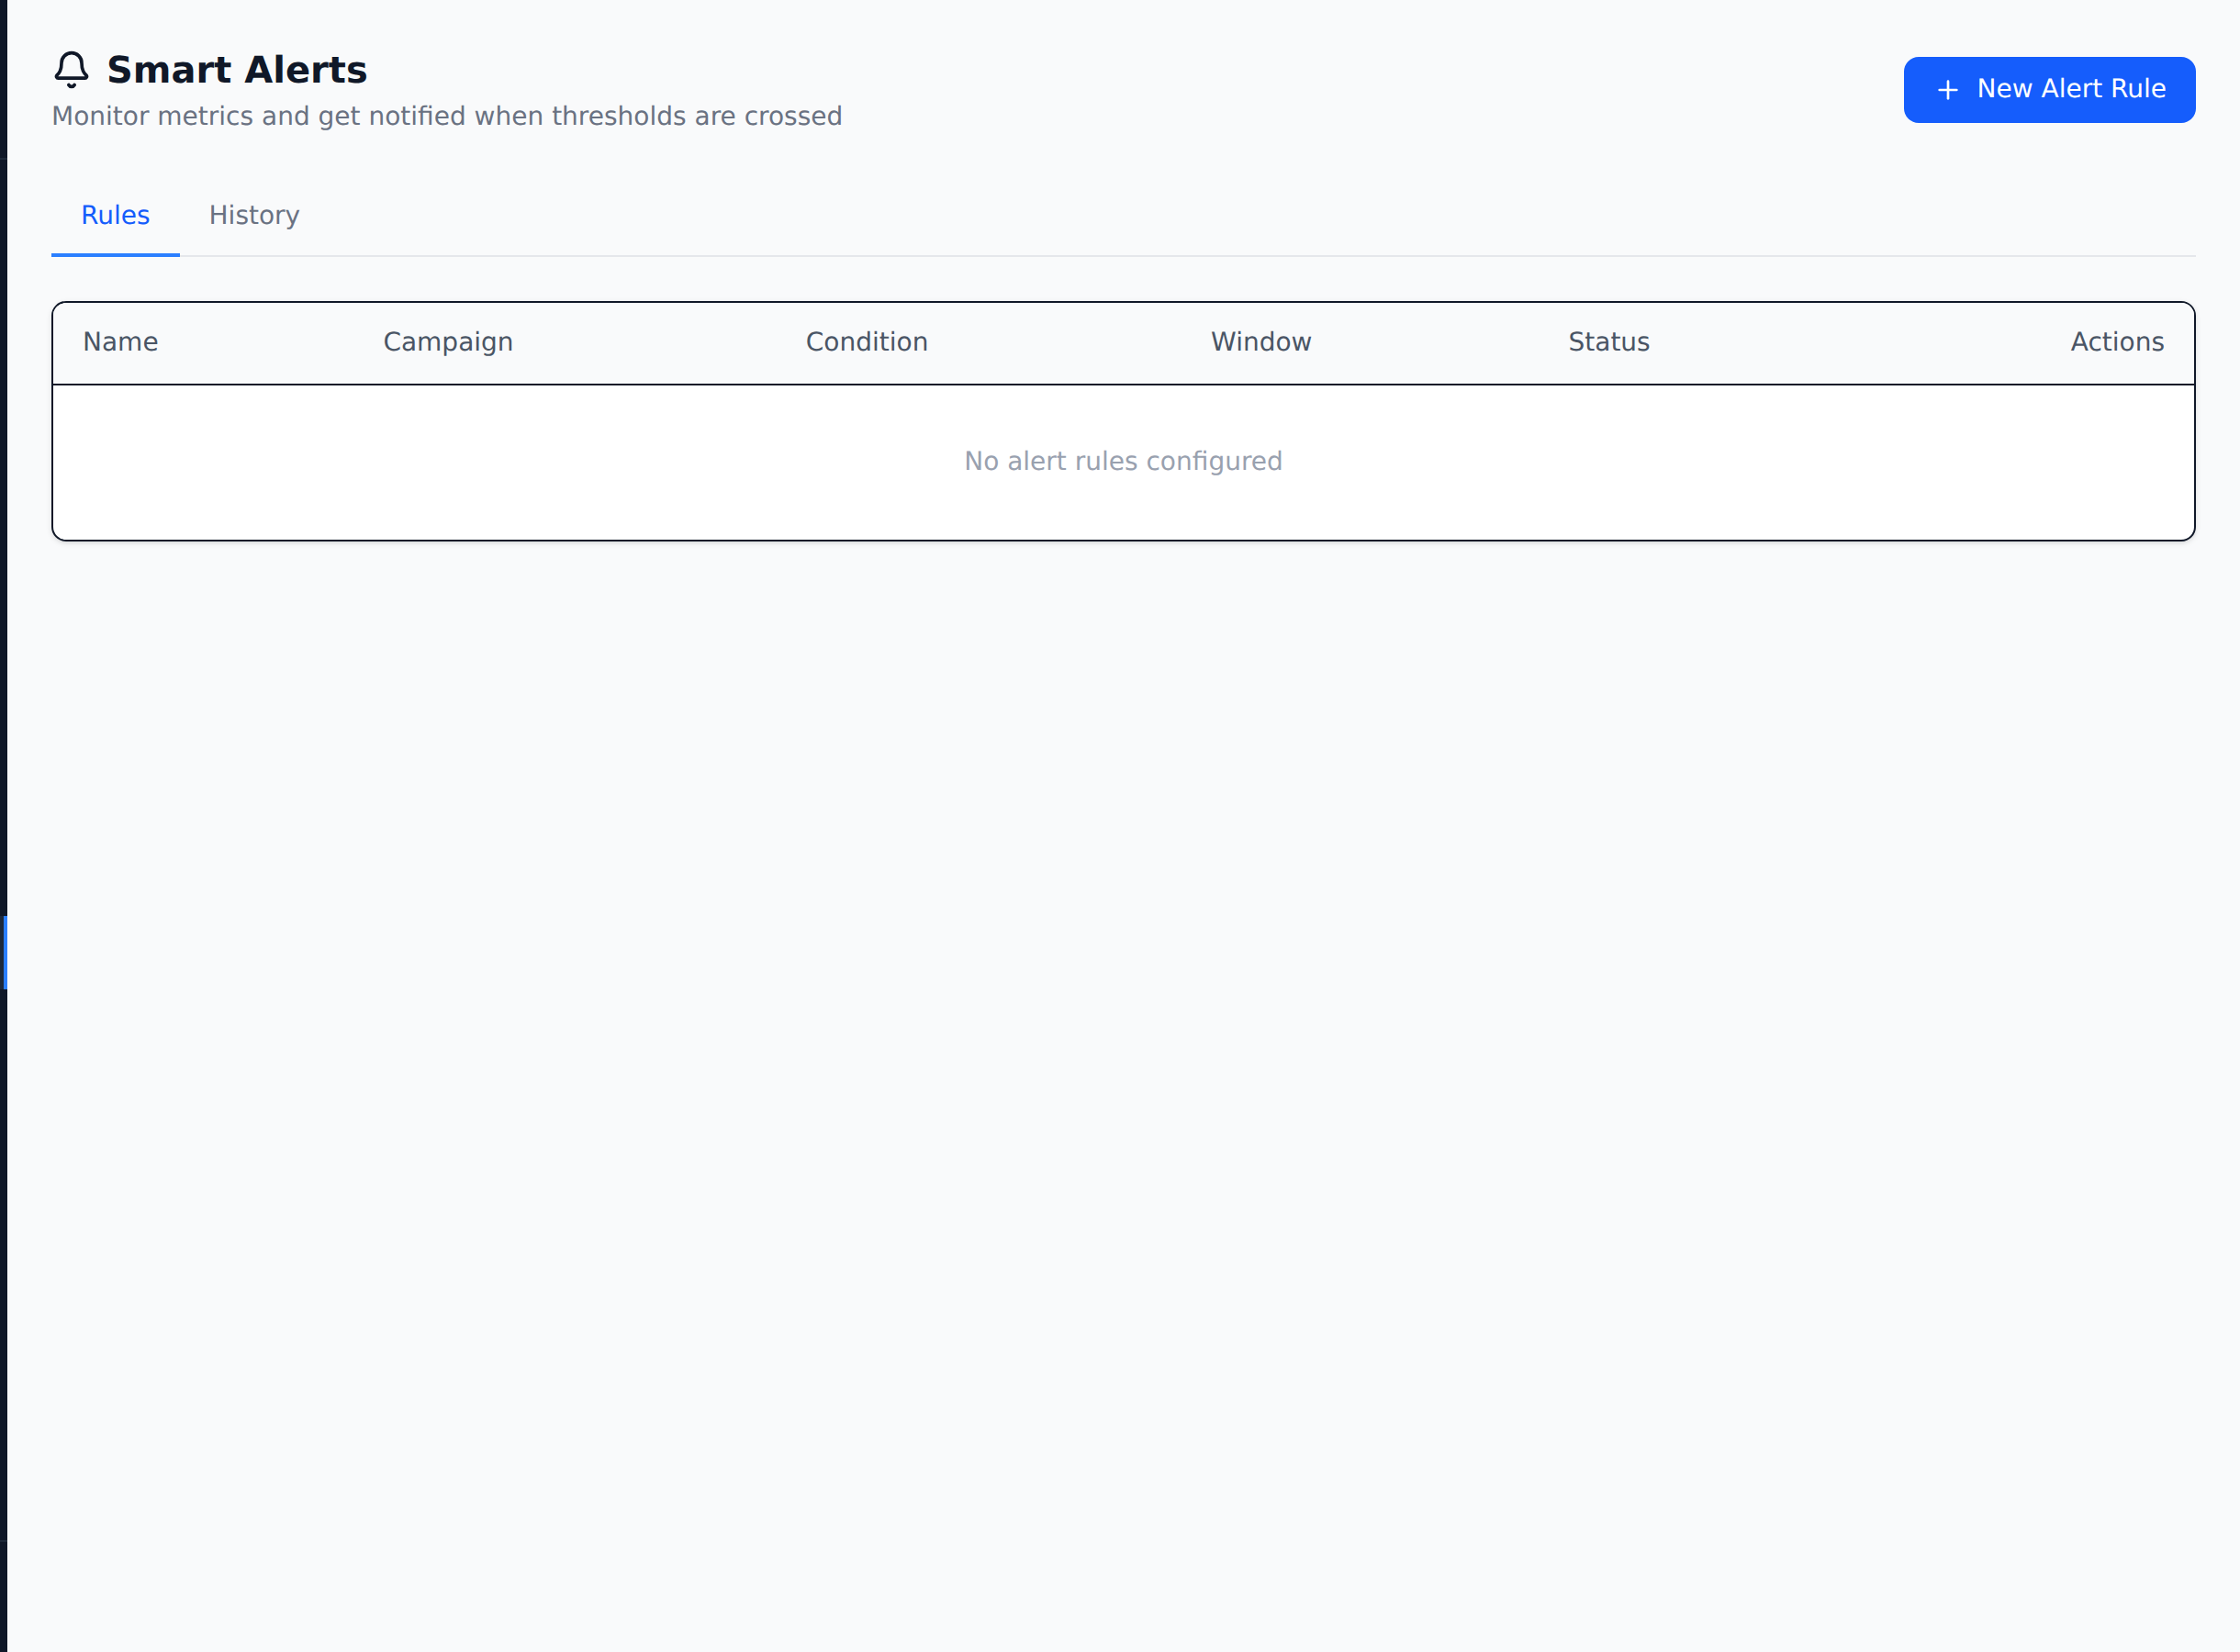
Setting up an alert
- Go to Smart Alerts in the sidebar
- Click + New Alert Rule
- Configure the rule:
- Name — descriptive label (e.g., "Low CR warning")
- Campaign — which campaign to monitor (or all campaigns)
- Metric — what to watch (clicks, conversions, revenue, CR, ROI, profit, bot clicks)
- Condition — greater than, less than, or equal to
- Threshold — the value that triggers the alert
- Window — time window to evaluate (in minutes, e.g., 60 = last hour)
- Webhook URL — where to send the notification (Slack, Discord, Telegram, etc.)
Available metrics
| Metric | Description |
|---|---|
| clicks | Total click count in the time window |
| conversions | Total conversion count |
| revenue | Total revenue ($) |
| cr | Conversion rate (%) |
| roi | Return on investment (%) |
| profit | Net profit (revenue minus cost) |
| bot_clicks | Number of clicks flagged as bot traffic |
Alert history
Switch to the History tab to see a log of every alert that has fired. Each entry shows the rule name, the metric value that triggered it, the threshold, and when it fired. You can acknowledge alerts to mark them as reviewed.
Webhook format
When an alert fires, Klixsor sends a POST request to your webhook URL with a JSON body:
{"text": "Alert 'Low CR': cr is 1.20 (threshold: 2.00) for campaign 'My Campaign'"}This format is compatible with Slack, Discord, and most webhook receivers out of the box.
API
GET    /api/v1/alerts            — list alert rules
POST   /api/v1/alerts            — create alert rule
PUT    /api/v1/alerts/:id        — update alert rule
DELETE /api/v1/alerts/:id        — delete alert rule
GET    /api/v1/alerts/history    — view alert history
POST   /api/v1/alerts/:id/ack   — acknowledge an alert
SmartPages — AI-Assisted SEO Content System
SmartPages is Klixsor's built-in content publishing system that turns your domains into fully-functional websites with auto-generated, SEO-optimized articles. Use it for AI-powered content sites, or as pre-landers for your campaigns.

A SmartPages site running on a custom domain with the News theme
SmartPages Setup
Follow these steps to get your first SmartPages site up and running.
Step 1: Enable SmartPages
Go to SmartPages → Settings and enable the system. You'll need an OpenAI API key for AI article rewriting.
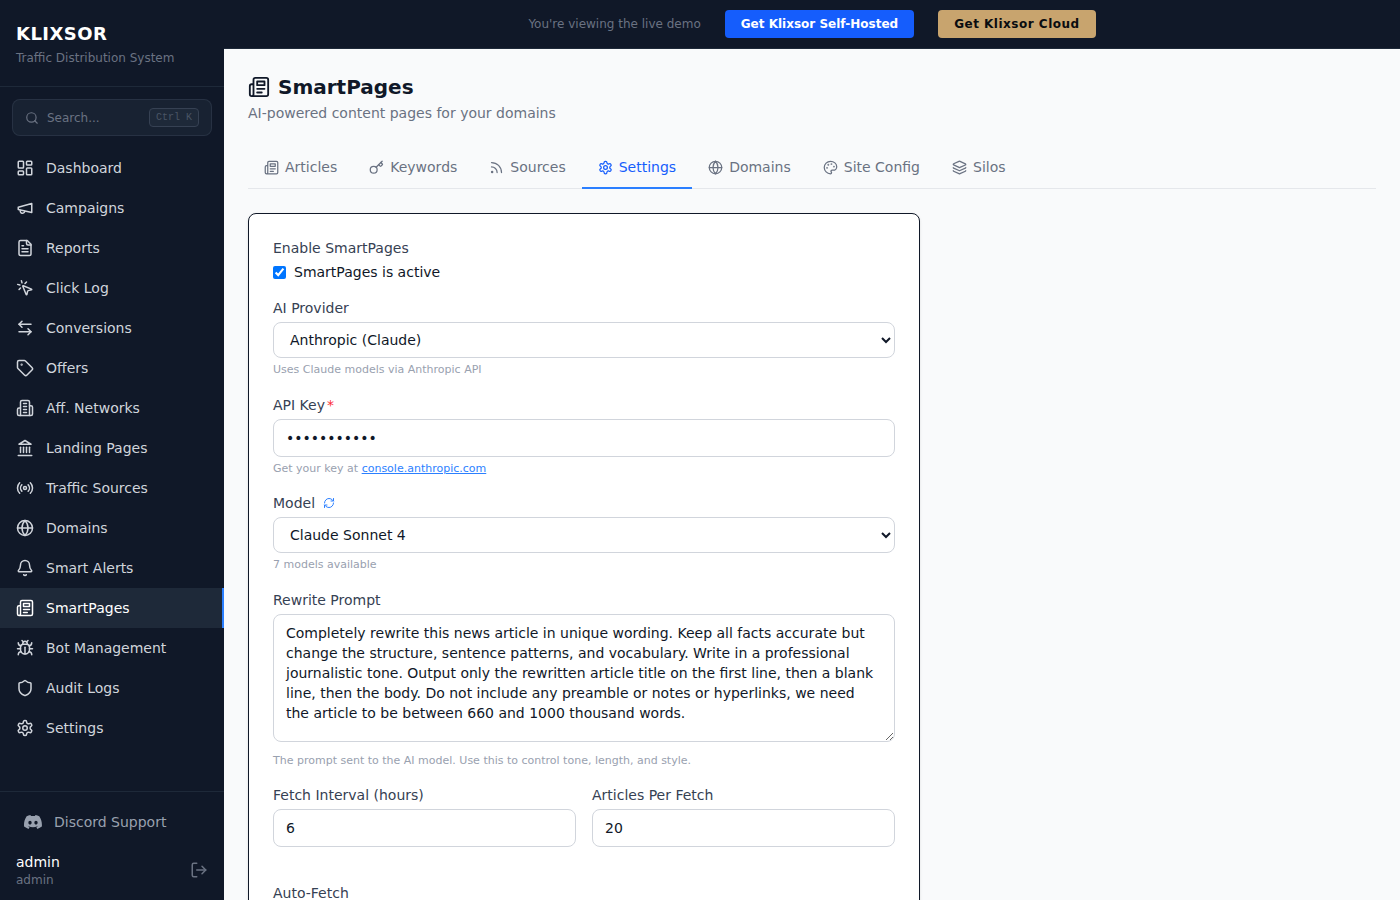
- Enabled: Toggle SmartPages on/off
- OpenAI API Key: Required for AI-powered article rewriting
- Rewrite Model: Choose between GPT-4o (higher quality) or GPT-4o-mini (faster/cheaper)
- Fetch Interval: How often to check RSS feeds for new content (default: 30 minutes)
- Articles Per Fetch: Maximum articles to pull per feed per cycle
Step 2: Add Content Sources
Go to SmartPages → Sources to add RSS feeds. SmartPages will automatically fetch articles from these feeds.
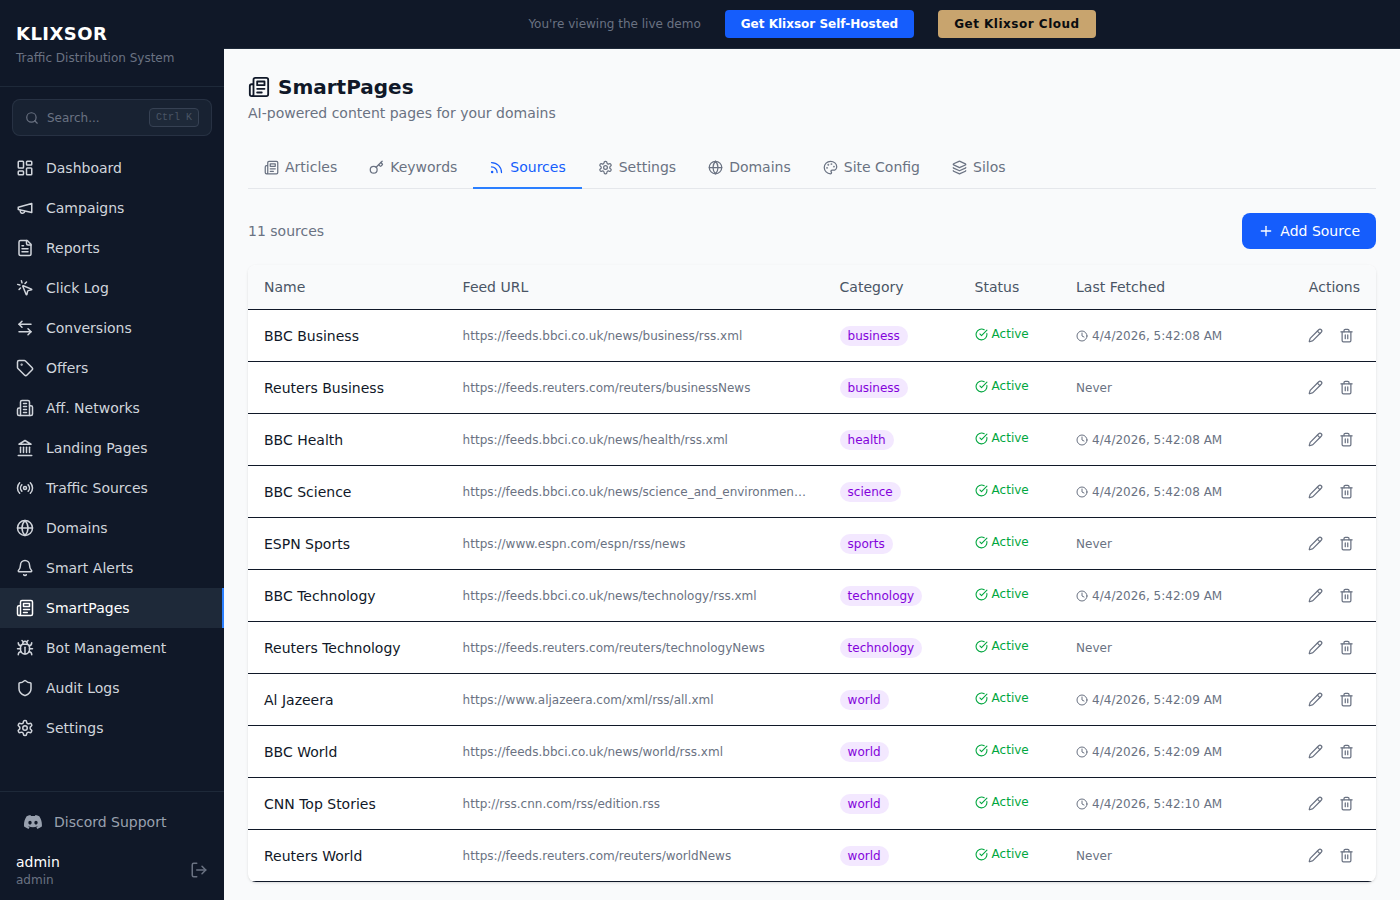
- Name: Descriptive name for the source
- RSS URL: The feed URL (e.g.
https://feeds.bbci.co.uk/news/rss.xml) - Category: Articles from this source will be tagged with this category
- Active: Enable/disable individual sources
Step 3: Add a Domain
Go to SmartPages → Domains, add your domain, and set its Content Mode to "SmartPages".
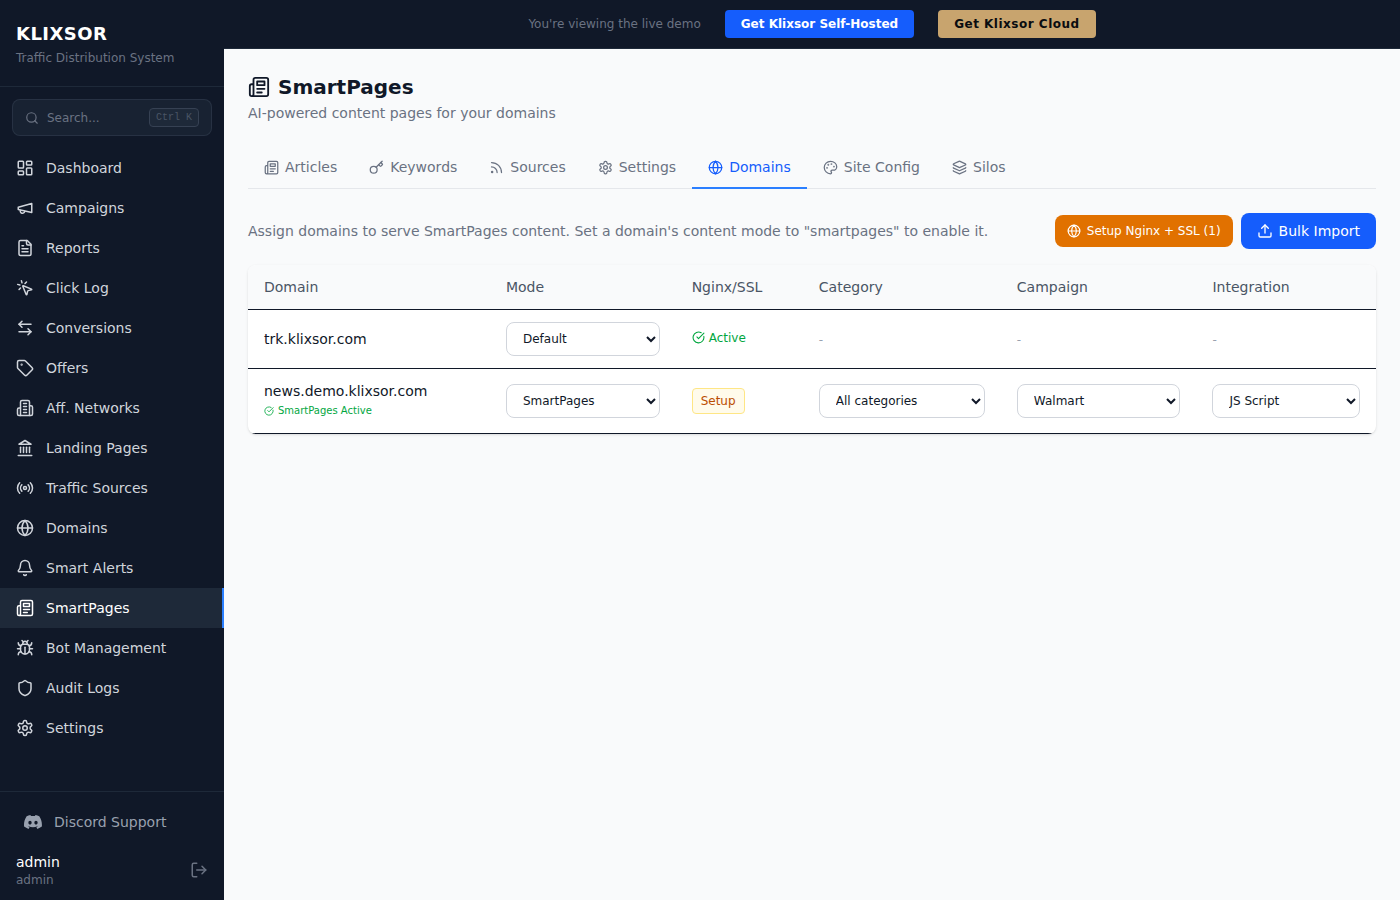
- Point your domain's DNS (A record or CNAME) to your server's IP address
- In Klixsor, add the domain under Domains or use Bulk Import
- Set Content Mode to SmartPages
- Click Setup to configure Nginx + SSL (automatic via Let's Encrypt)
- Wait a few seconds — your site is live!
Domain Configuration Options
| Field | Description |
|---|---|
| Content Mode | Set to "SmartPages" to serve articles on this domain |
| Category | Filter which articles appear — select a specific category or "All categories" |
| Campaign | Link a campaign for traffic monetization (optional) |
| Integration | CTA Button: Shows a call-to-action banner. JS Script: Injects campaign's tracking.js to route visitors through flows |
Managing Articles
The Articles tab shows all fetched and rewritten articles with their status.
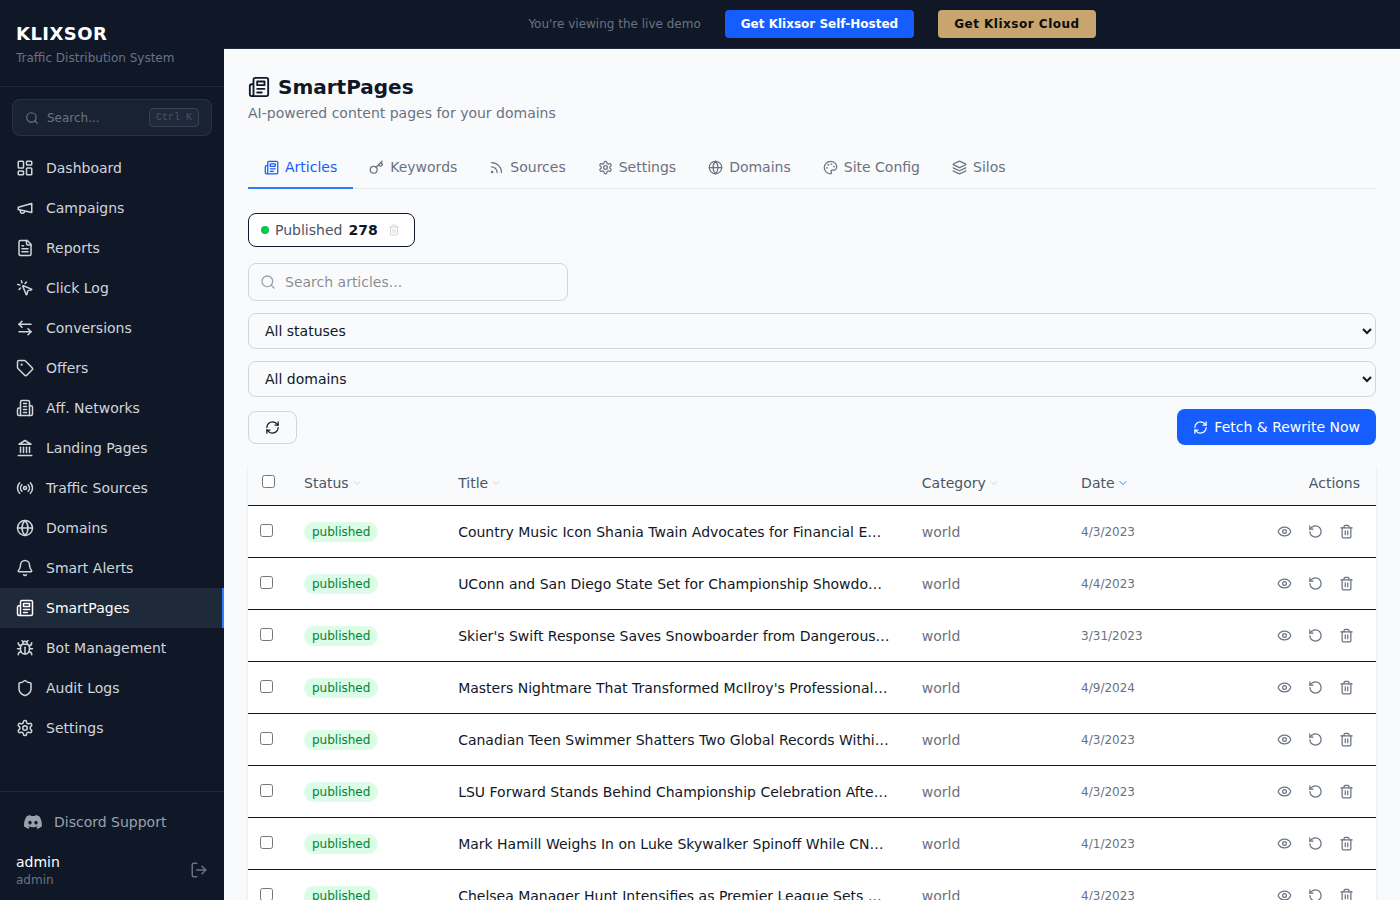
Article Statuses
- Pending: Fetched from RSS, waiting for AI rewrite
- Rewriting: Currently being processed by the AI model
- Published: Live on your SmartPages domain(s)
- Failed: Rewrite failed — check the error and retry
Article Actions
- Edit: Modify title, body, meta description, slug, or category
- Regenerate: Re-run the AI rewrite with updated prompts
- Delete: Remove the article permanently
- Bulk Actions: Select multiple articles to publish, unpublish, regenerate, or delete
Keyword-Based Generation
Instead of relying only on RSS feeds, you can generate articles from specific keywords. Go to SmartPages → Keywords.
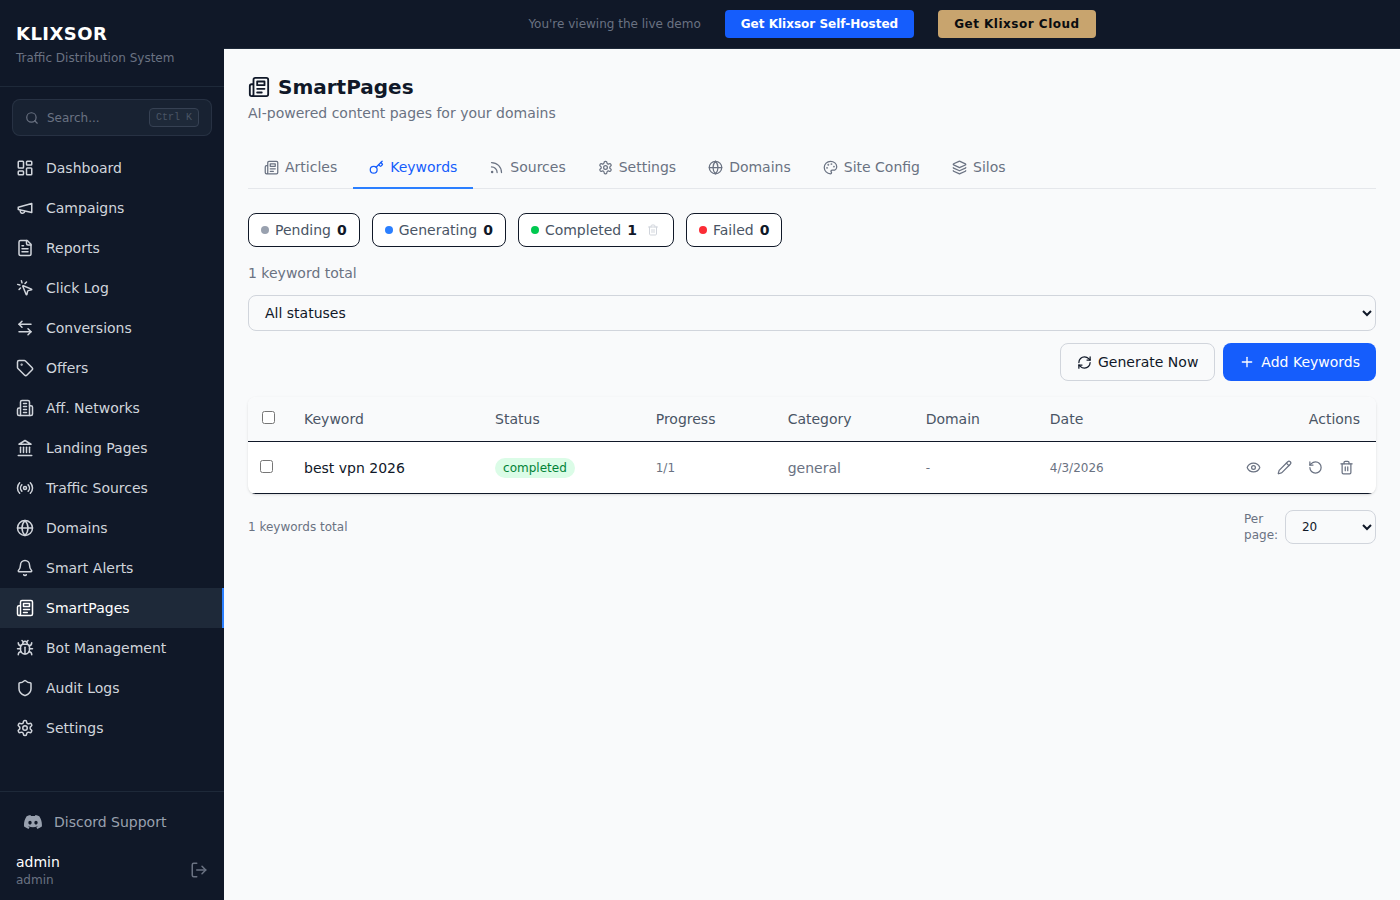
- Click Add Keywords and enter your target keywords (one per line)
- Select a category and target domain
- Click Generate to trigger AI article creation for pending keywords
- Articles are generated with SEO-optimized titles, meta descriptions, and slugs
Site Configuration
Customize how your SmartPages site looks. Go to SmartPages → Site Config and select a domain.
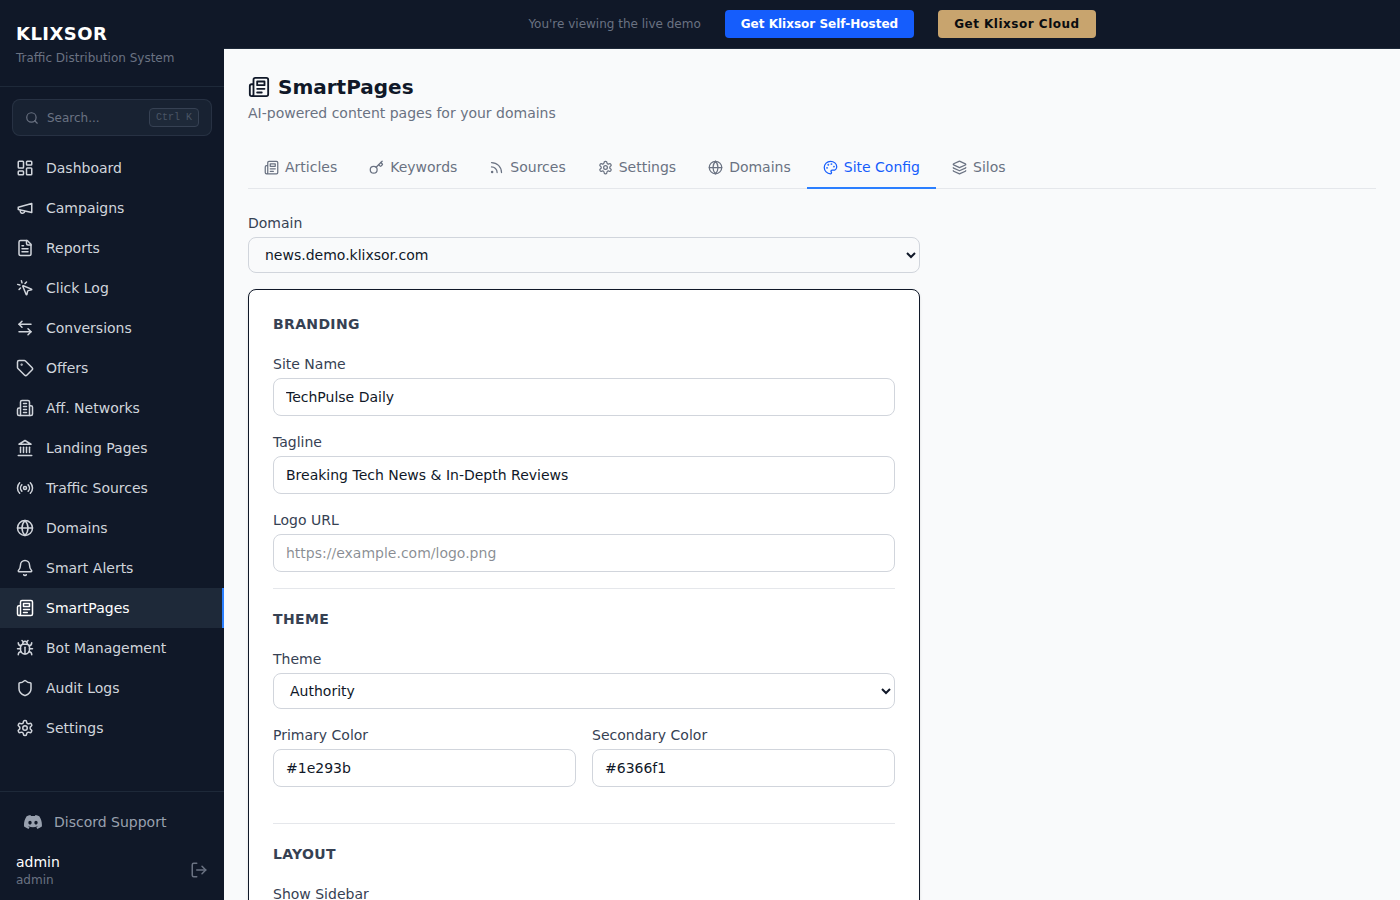
Branding
- Site Name: Displayed in the header and page titles
- Tagline: Subtitle shown next to the site name
- Logo URL: Custom logo image (replaces text title)
- Primary/Secondary Colors: Theme accent colors
Theme Selection
Choose from 4 built-in themes that control the overall look and layout:
- News: Magazine-style with large hero, 3-column grid, dark header
- Blog: Clean, single-column layout ideal for long-form content
- Niche: Review/affiliate style with prominent CTAs and sidebar
- Authority: Professional multi-column layout with silo navigation
Navigation & Footer
- Nav Links: Custom navigation menu items
- Footer Columns: Configurable footer with multiple columns of links
- Custom HTML: Inject custom code in
<head>or before</body>
Sidebar Widgets
- Recent Posts: Latest published articles
- Categories: Article category list with counts
- CTA Box: Custom call-to-action with button
- Custom HTML: Any HTML content
Silos & Content Organization
Silos let you organize articles into topical clusters — a proven SEO strategy. Each silo has a pillar article and supporting articles that interlink. Go to SmartPages → Silos.
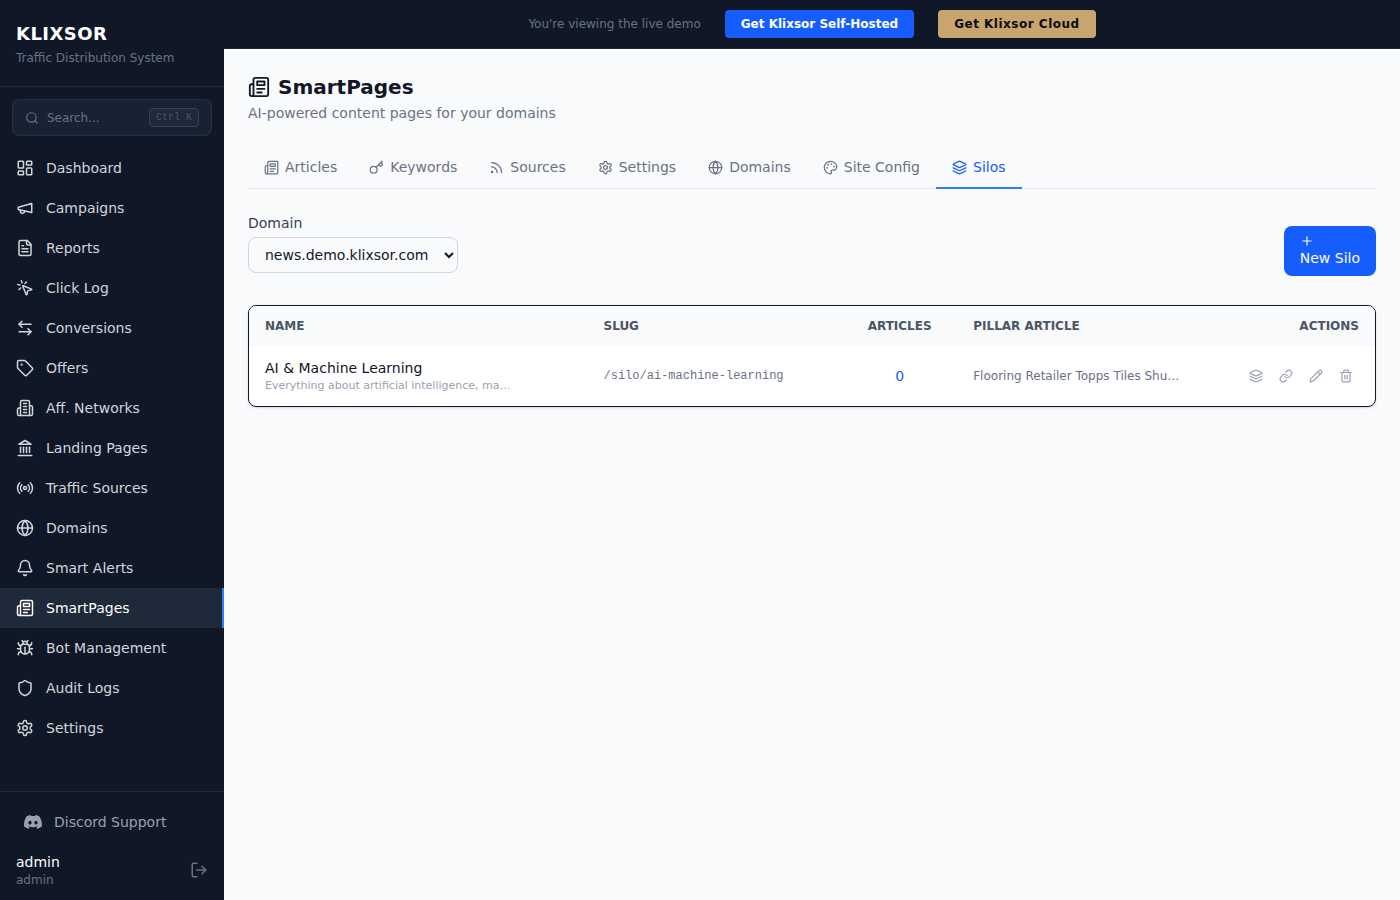
Creating a Silo
- Click New Silo
- Enter a name (e.g. "Best VPN Reviews") — the slug auto-generates
- Add a description and optionally set a pillar article
- Click Manage Articles to assign articles to the silo
Managing Silo Articles
Click the article count or the Layers icon to open the article management panel:
- Top section: Articles currently in the silo — select and remove if needed
- Bottom section: All available articles with search, category filter, and silo status filter
- Select articles and click Add to silo to assign them
- Articles can be moved between silos (reassigned from another silo)
Internal Linking
Click the Link icon on a silo to auto-build internal links:
- Pillar → Supporting: The pillar article links to all supporting articles
- Supporting → Pillar: Each supporting article links back to the pillar
- Supporting → Supporting: Cross-links between related articles in the silo
Silo Pages
Each silo gets its own page at /silo/{slug} (e.g. /silo/best-vpn-reviews). This page features the pillar article prominently and lists all supporting articles below.
Campaign Integration
SmartPages can integrate with your Klixsor campaigns to monetize traffic. There are two integration modes:
CTA Button Mode
Adds a call-to-action banner on article pages that links to your campaign's tracking URL. Visitors who click the CTA are routed through the campaign's normal flow (bot detection, offer rotation, etc.).
Good for: affiliate content sites where you want the visitor to read the article first, then click through to the offer.
JS Script Mode (Full Flow Routing)
Injects the campaign's tracking.js on every page. The script automatically:
- Registers a click through your campaign's flow pipeline
- Runs bot detection — if a bot is detected, it can stay on the page (if your forced flow is set to "do nothing") or be redirected to a safe page
- Routes real visitors through your campaign's regular/default flows
- Redirects visitors to the offer URL per your flow configuration
- Decorates external links with click IDs for conversion attribution
Good for: cloaking setups where you want search engines to see content but real visitors to be redirected to offers.
Setting Up Campaign Integration
- Create a campaign with at least one offer and a default flow
- In SmartPages → Domains, select the campaign in the "Campaign" column
- Choose integration mode: CTA Button or JS Script
- The integration is active immediately — clicks will appear in your Click Log
SEO Features
SmartPages is built for search engine optimization out of the box:
Automatic SEO
- XML Sitemap: Auto-generated at
/sitemap.xmlwith all articles, categories, silos, and legal pages - robots.txt: Properly configured to allow crawling and point to sitemap
- Schema.org Markup: Article, Organization, and BreadcrumbList structured data on every page
- Open Graph Tags: Full og:title, og:description, og:image, og:type for social sharing
- Canonical URLs: Prevents duplicate content issues
- Meta Descriptions: AI-generated meta descriptions for every article
- Breadcrumbs: Hierarchical navigation showing Home → Category → Article
Legal Pages
Every SmartPages site automatically includes:
- Privacy Policy (
/privacy-policy) — GDPR and CCPA compliant - Terms of Service (
/terms) — Standard terms covering content usage - Cookie Consent Banner — GDPR-compliant cookie notice with Accept/Decline
These pages use your site name and domain automatically — no manual configuration needed. Legal links appear in every page footer.
Image Optimization
SmartPages automatically upgrades thumbnail images from RSS feeds to high-resolution versions. For example, BBC feed images are upgraded from 240px to 960px width for crisp display on all devices.
Bot Detection — How It Works
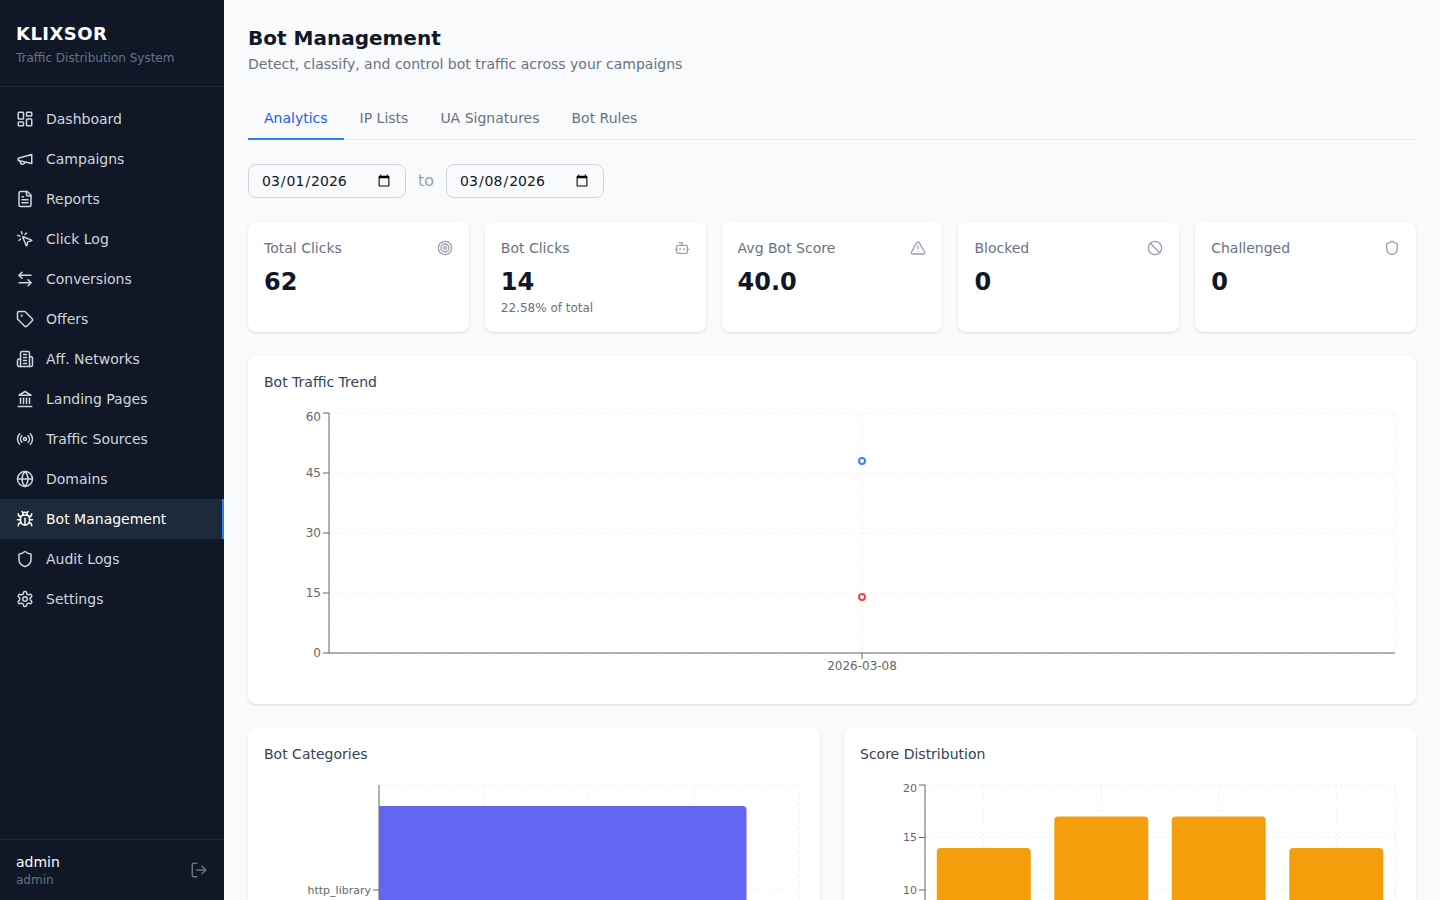
Klixsor uses a multi-signal scoring system to detect bots. Every click is scored from 0 (human) to 100 (definite bot) using 11 independent detection signals.
Detection signals
- IP reputation — Checked against 25 auto-synced datacenter, cloud, and VPN/Tor IP lists (+40 score)
- User agent analysis — Known bot UAs, suspicious patterns, empty/missing UA (+25-30 score)
- Header anomalies — Missing Accept-Language, unusual Accept header (+5-10 score)
- Header order fingerprint — Detects non-browser HTTP header ordering (+10 score)
- DNS verification — Reverse DNS lookup for claimed crawlers (Googlebot, Bingbot) (+10 for fake bots)
- Datacenter IP detection — Known cloud/datacenter ASN matching (+20 score)
- Proxy/VPN detection — Anonymous proxy and VPN IP identification (+15 score)
- Ad review referrer — Detects traffic from ad platform review systems (+15 score)
- Prefetch detection — Identifies browser prefetch/prerender requests (+20 score)
- JS fingerprint challenge — Validates browser fingerprint data from JS challenges (-15 for valid, +15-20 for invalid)
Score thresholds
| Score | Classification | Default action |
|---|---|---|
| 0 – 39 | Human | Normal routing |
| 40 – 69 | Suspicious | Challenge page (configurable) |
| 70 – 255 | Bot | Safe page or block |
Bot Rules
Create custom rules to override bot scoring based on specific conditions. Rules are evaluated in priority order (lower number = higher priority) and can be scoped globally, per domain, or per campaign.
Conditions
Each rule can have multiple conditions combined with AND logic. Available condition types:
| Condition | Operators | Description |
|---|---|---|
bot_score | eq, gt, gte, lt, lte | Numeric bot score (0-100) |
is_bot | eq | Boolean — whether score exceeds threshold |
bot_category | eq, neq | Category: human, ad_review, search_engine, headless, etc. |
ip | eq, contains | IP address or CIDR range |
user_agent | contains | User-Agent substring match |
country | eq, neq | 2-letter country code |
device_type | eq, neq | desktop, mobile, tablet |
os | eq, neq | Operating system name |
browser | eq, neq | Browser name |
referrer | contains | Referrer URL substring |
language | eq, neq | Browser language code |
is_proxy | eq | Boolean — proxy/VPN detection |
visit_count | eq, gt, gte, lt, lte | Number of visits from this IP to this campaign |
Actions
- Allow — Force-allow regardless of bot score
- Block — Return 403 Forbidden
- 404 — Return 404 Not Found
- Safe page — Show the campaign's safe page
- Redirect — Send to a custom URL (301/302/meta refresh)
- Show HTML — Serve custom HTML content
- Show text — Serve plain text response
- JS Challenge — Serve a JavaScript fingerprint challenge page (see JS Fingerprint Challenge)
- Tag only — Mark as bot in analytics but allow through
- Fake page — Serve a decoy page
- Honeypot — Serve a honeypot trap page
- Rate limit — Throttle requests from the IP
- Delay — Add artificial delay before response
IP Lists
Klixsor auto-syncs 25 IP lists from datacenter providers, cloud platforms, and VPN services daily:
Search engine & ad platform bots (allow lists)
- Googlebot, Google Ads, Google Special Crawlers
- Bingbot, Applebot
- Facebook/Meta
Datacenter & cloud providers (challenge lists)
- AWS, Google Cloud (GCP), Microsoft Azure
- DigitalOcean, Oracle Cloud (OCI), Hetzner
- OVH, Vultr, Linode, Scaleway, Cloudflare
VPN & Tor providers (block lists)
- Tor Exit Nodes (from torproject.org)
- NordVPN, ExpressVPN, Surfshark
- CyberGhost, Private Internet Access (PIA), Mullvad
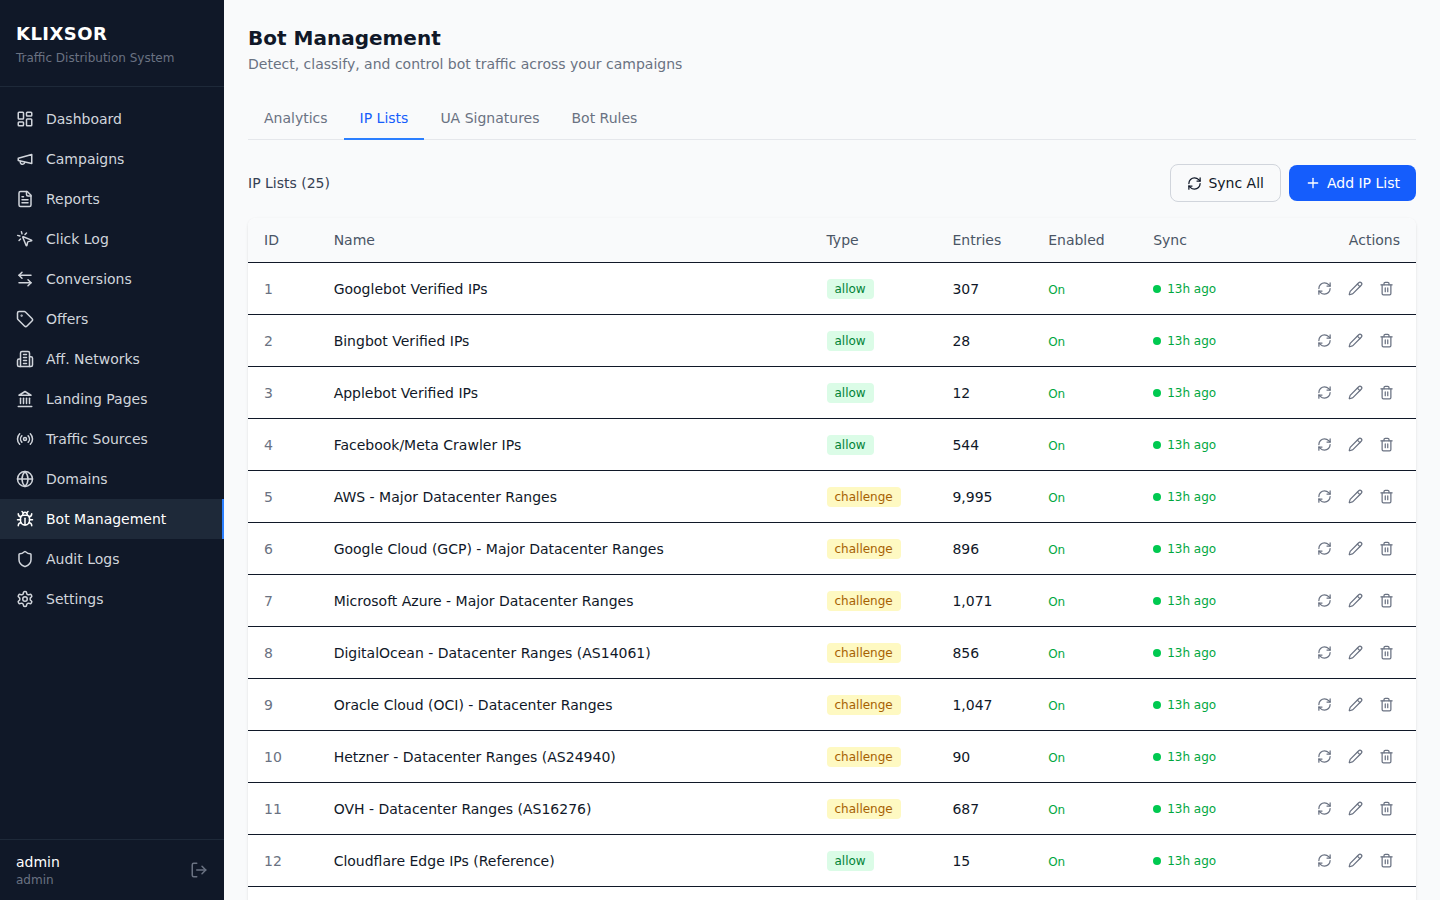
Lists sync automatically on first install and every 24 hours thereafter. Each list has a configurable type:
- Allow — Known good bots (Googlebot, etc.) — allows them through
- Challenge — Datacenter IPs — triggers a challenge or increases bot score
- Block — VPN/Tor IPs — blocks or redirects to safe page
You can also add custom IP lists manually with individual IPs or CIDR ranges.
VPN & Tor Detection
Klixsor includes built-in detection for major VPN providers and the Tor network. These IP lists are auto-synced daily from authoritative sources.
How it works
- Tor Exit Nodes — Synced directly from the Tor Project's bulk exit list (
check.torproject.org) - VPN Providers — IP ranges are fetched via RIPE Stat ASN prefix announcements for each provider's registered ASN
Supported VPN providers
| Provider | ASN | Detection method |
|---|---|---|
| NordVPN | AS212238 | RIPE Stat prefix announcements |
| ExpressVPN | AS394711 | RIPE Stat prefix announcements |
| Surfshark | AS211298 | RIPE Stat prefix announcements |
| CyberGhost | AS9009 | RIPE Stat prefix announcements |
| Private Internet Access | AS26347 | RIPE Stat prefix announcements |
| Mullvad VPN | AS198093 | RIPE Stat prefix announcements |
| Tor Network | — | Exit node list from torproject.org |
Configuration
VPN and Tor lists are enabled by default with block type. You can change the behavior per list in Bot Management → IP Lists:
- Set to Block to deny VPN/Tor traffic
- Set to Challenge to show a JS challenge page instead
- Disable individual lists if you don't want to block specific VPN providers
JS Fingerprint Challenge
The JavaScript fingerprint challenge is an advanced bot detection action that serves a "Checking your browser..." page, collects real browser fingerprint data, and uses it to verify whether the visitor is human.
How it works
- When a bot rule triggers the
challenge_jsaction, Klixsor serves an HTML page with embedded JavaScript - The JavaScript collects 15+ browser signals including timezone, screen resolution, canvas rendering, WebGL capabilities, and audio context
- These signals are encoded and stored in a
_kfpcookie - After 1.5 seconds, the visitor is redirected back to the same URL with a
_bc=1parameter - On the second request, the bot detector reads the fingerprint cookie and validates the data
Fingerprint signals collected
- Timezone, language, platform
- Hardware concurrency, device memory, touch points
- Screen width/height, color depth, device pixel ratio
- Canvas rendering hash (unique per GPU/driver)
- WebGL renderer and vendor strings
- Audio context FFT size
- WebGL support, PDF viewer detection
Scoring impact
| Scenario | Score impact |
|---|---|
| Valid fingerprint with 4+ real browser signals | -15 (reduces bot score) |
| Cookie present but fingerprint data is invalid | +15 (increases bot score) |
| Challenge redirect detected but no fingerprint cookie | +20 (headless bot) |
Setting up a JS challenge rule
Go to Bot Management → Bot Rules and create a rule:
- Set a condition like
bot_score gte 30(suspicious visitors) - Select action JavaScript Challenge
- Save the rule
Headless bots (Puppeteer, Selenium) typically fail the challenge because they either can't execute JavaScript or produce detectable fingerprint anomalies.
Visit Count Rules
The visit_count condition lets you create bot rules based on how many times an IP has visited a specific campaign. This is useful for detecting aggressive scrapers, click fraud, and repeated bot visits.
How it works
- Every click increments a per-IP, per-campaign counter stored in Redis
- The counter uses the campaign's uniqueness TTL as the expiration window (default: 24 hours)
- Bot rules can match on this counter using numeric operators
Example rules
| Condition | Action | Use case |
|---|---|---|
visit_count gte 10 | Challenge JS | Challenge IPs with 10+ visits |
visit_count gte 50 | Block | Block aggressive scrapers |
visit_count gte 5 + bot_score gte 20 | Safe page | Show safe page to repeat suspicious visitors |
Setting it up
- Go to Bot Management → Bot Rules
- Create a new rule
- Add a condition with type
visit_count, operatorgte, and your threshold value - Choose an action (block, challenge, redirect, etc.)
- Set the priority (lower = evaluated first)
Domain Health Monitoring
Klixsor automatically monitors the health of all your tracking domains every 5 minutes. If a domain goes down or becomes degraded, you'll see it immediately in the Domains page.
Health statuses
| Status | Meaning |
|---|---|
| Healthy | Domain responds with HTTP 2xx-4xx and latency under 5 seconds |
| Degraded | Domain responds with HTTP 5xx or latency exceeds 5 seconds |
| Down | Domain is unreachable (connection refused, DNS failure, timeout) |
| Unknown | Not yet checked (newly added domain) |
What's monitored
- HTTP status code — The response code from hitting the domain root URL
- Response latency — Time to first byte in milliseconds
- SSL validity — Whether the HTTPS certificate is valid (if SSL is enabled)
- Error details — Specific error message when the domain is down
Manual health check
Click the pulse icon next to any domain's health badge to run an on-demand health check. The result updates immediately in the UI.
API endpoint
curl -X POST https://admin.yourdomain.com/api/v1/domains/1/check-health \
  -H "Authorization: Bearer YOUR-JWT-TOKEN"

# Response includes updated health fields:
# { "id": 1, "name": "track.example.com", "health_status": "healthy",
#   "health_http_code": 200, "health_latency_ms": 42, ... }
Updating Klixsor
Updates are safe and non-destructive. All your data, configuration, and credentials are preserved.
Check for updates
Go to Settings in the admin panel sidebar. The Version card shows:
- Current Version — the version running on your server
- Latest Version — the newest release available
- Update Available indicator — shown when a newer version exists
If an update is available, the Settings page displays the update command you need to run.
Update to the latest version
SSH into your server and run:
curl -sSL https://klixsor.com/install.sh | bash -s -- --updateWhat happens during an update
- Backup — PostgreSQL database dump + config files saved to
/var/lib/klixsor/backups/ - Stop — Click engine and API gracefully stopped
- Download — New binaries downloaded and validated (ELF header check prevents corrupt downloads)
- Migrate — New database migrations applied (idempotent, safe to re-run)
- Start — Services restarted
- Verify — Health check confirms everything is running
- Rollback — If the health check fails, old binaries and database are automatically restored
What's preserved
- All campaign, domain, and user data
- Click history and conversion data
- Configuration file (
config.yaml) - Database passwords and JWT secret (
.env) - License key
- Nginx configs and SSL certificates
- Firewall rules
- Admin credentials
Update to a specific version
curl -sSL https://klixsor.com/install.sh | bash -s -- --update --version 1.2.0Skip backup (faster, not recommended)
curl -sSL https://klixsor.com/install.sh | bash -s -- --update --no-backupSettings Page
The Settings page (accessible from the sidebar) provides a system overview with four information cards:
GeoIP Databases (Required)
Klixsor uses MaxMind GeoLite2 databases for precise geolocation tracking (Country, City, ISP). You must provide your own free license key after installation to enable this functionality.
- Sign up for a free MaxMind account (the signup link is provided directly in the dashboard).
- Generate a License Key from your MaxMind account dashboard.
- Paste the key into the GeoIP panel and click Update Now to instantly download the databases.
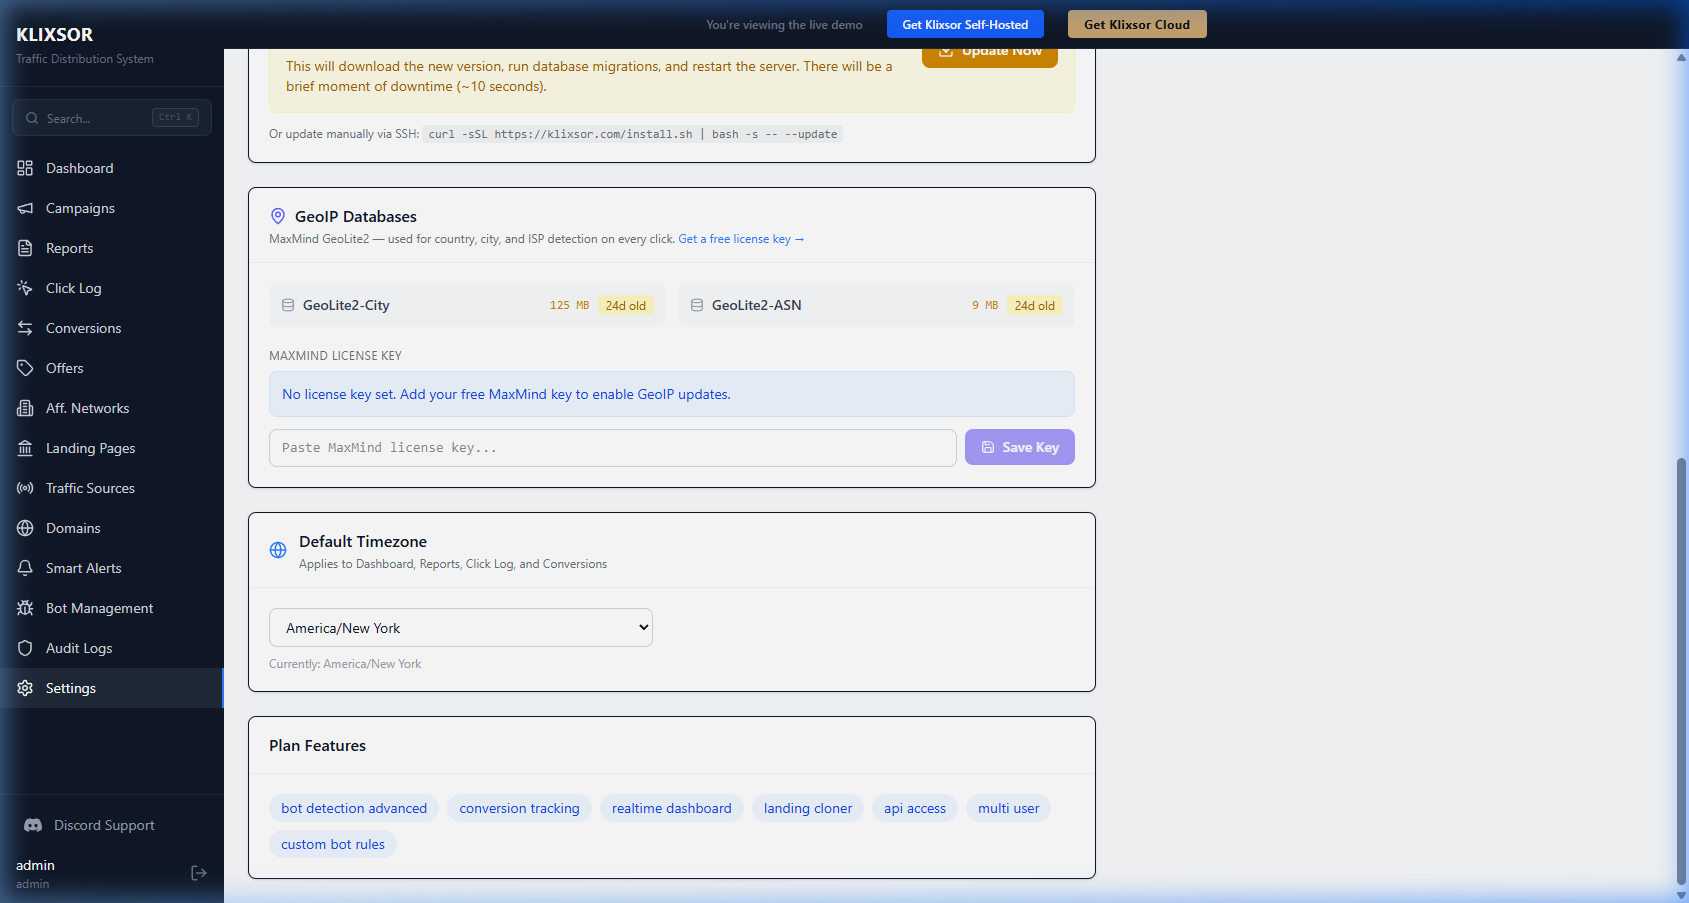
License
- Status — Active, Invalid, or Grace Period
- Plan — Your current subscription tier (Starter, Pro, Enterprise)
- License Key — Masked display of your license key
- Expires — License expiration date with a warning if expiring soon
Usage & Limits
Visual progress bars showing your current usage against plan limits:
- Campaigns — current / maximum campaigns
- Domains — current / maximum domains
- Users — current / maximum users
Bars turn yellow at 70% and red at 90% usage. "Unlimited" is shown for Enterprise plans.
Version
- Current Version — the version running on this server
- Latest Version — the newest version available from klixsor.com
- Update Available — indicator with the update command when a new version exists
Plan Features
Shows which features are included in your plan (e.g., landing page cloner, API access, custom bot rules). Only displayed when features are restricted by your plan.
Backups & Restore
Automatic backups
Every update creates an automatic backup at /var/lib/klixsor/backups/klixsor_backup_YYYYMMDD_HHMMSS/. The 5 most recent backups are kept.
Manual backup
# PostgreSQL dump
docker exec klixsor-postgres pg_dump -U klixsor -d klixsor \
  --format=custom -f /tmp/klixsor_backup.dump
docker cp klixsor-postgres:/tmp/klixsor_backup.dump ./klixsor_backup.dump

# Config files
cp /opt/klixsor/configs/config.yaml ./config.yaml.bak
cp /opt/klixsor/.env ./.env.bak
Restore from backup
# Stop services
systemctl stop klixsor-api klixsor-clickengine

# Restore PostgreSQL
docker cp klixsor_backup.dump klixsor-postgres:/tmp/restore.dump
docker exec klixsor-postgres pg_restore -U klixsor -d klixsor \
  --clean --if-exists /tmp/restore.dump

# Restore config
cp config.yaml.bak /opt/klixsor/configs/config.yaml

# Restart
systemctl start klixsor-api klixsor-clickengine
License Management
How licensing works
- Your license key is stored at
/opt/klixsor/license.key - Klixsor validates the license with the Klixsor license server every 6 hours
- If the server is unreachable, a 72-hour grace period allows continued operation
- Plan limits (campaigns, domains, users) are enforced based on your subscription tier
Update your license key
# Method 1: Via the update script
curl -sSL https://klixsor.com/install.sh | bash -s -- --update NEW-LICENSE-KEY

# Method 2: Manually
echo "NEW-LICENSE-KEY" > /opt/klixsor/license.key
systemctl restart klixsor-api klixsor-clickengine
Plan limits
| Resource | Starter | Pro | Enterprise |
|---|---|---|---|
| Campaigns | 10 | 50 | Unlimited |
| Domains | 3 | 10 | Unlimited |
| Users | 1 | 5 | Unlimited |
| Clicks/day | 100k | 1M | Unlimited |
| Data retention | 6 months | 12 months | Unlimited |
| Landing cloner | — | ✓ | ✓ |
| API access | — | ✓ | ✓ |
| Custom bot rules | — | — | ✓ |
Troubleshooting
Services won't start
# Check service status and logs
systemctl status klixsor-api
journalctl -u klixsor-api -n 50 --no-pager

systemctl status klixsor-clickengine
journalctl -u klixsor-clickengine -n 50 --no-pager

# Check if Docker containers are running
docker ps
Port already in use
# Find what's using port 8081
fuser 8081/tcp
# Kill the process
fuser -k 8081/tcp
# Restart
systemctl restart klixsor-api
Database connection failed
# Check if PostgreSQL is running
docker exec klixsor-postgres pg_isready -U klixsor

# Restart Docker containers
cd /opt/klixsor && docker compose --env-file .env up -d

# Verify password matches config
grep password /opt/klixsor/configs/config.yaml
grep POSTGRES_PASSWORD /opt/klixsor/.env
License validation errors
# Check license key
cat /opt/klixsor/license.key

# Test connectivity to license server
curl -s https://klixsor.com/api/license/validate

# Check logs for license errors
journalctl -u klixsor-api | grep license
Bot IP lists empty
Lists sync automatically on first install. If they're empty:
# Restart the API to trigger sync
systemctl restart klixsor-api

# Check logs for sync status
journalctl -u klixsor-api | grep "bot.*sync"
Need help?
Contact us at support@klixsor.com with your server's API logs and we'll help you get running.
API Authentication
The Klixsor API uses JWT tokens. Obtain a token by logging in, then include it in the Authorization header.
Login
curl -X POST https://admin.yourdomain.com/api/v1/auth/login \
  -H "Content-Type: application/json" \
  -d '{"login": "admin", "password": "your-password"}'

# Response:
# { "token": "eyJhbGciOi...", "refresh_token": "..." }
Authenticated request
curl https://admin.yourdomain.com/api/v1/campaigns \
  -H "Authorization: Bearer YOUR-JWT-TOKEN"
API Endpoints
All endpoints are under /api/v1/ and require JWT authentication (except login).
| Method | Path | Description |
|---|---|---|
POST | /auth/login | Login, get JWT token |
POST | /auth/refresh | Refresh JWT token |
GET | /auth/me | Current user info |
| Campaigns | ||
GET | /campaigns | List campaigns |
POST | /campaigns | Create campaign |
GET | /campaigns/:id | Get campaign |
PUT | /campaigns/:id | Update campaign |
DELETE | /campaigns/:id | Delete campaign |
POST | /campaigns/:id/clone | Clone campaign |
| Optimization | ||
GET | /campaigns/:id/optimization | List optimization rules |
POST | /campaigns/:id/optimization | Create optimization rule |
PUT | /campaigns/:id/optimization/:ruleId | Update optimization rule |
DELETE | /campaigns/:id/optimization/:ruleId | Delete optimization rule |
GET | /campaigns/:id/optimization/logs | View optimization logs |
| Smart Alerts | ||
GET | /alerts | List alert rules |
POST | /alerts | Create alert rule |
PUT | /alerts/:id | Update alert rule |
DELETE | /alerts/:id | Delete alert rule |
GET | /alerts/history | View alert history |
POST | /alerts/:id/ack | Acknowledge alert |
| LP CTR Tracking | ||
POST | /lp-events | Track LP event (view or cta_click) |
GET | /lp-events/ctr | Get LP click-through rates |
| Offers | ||
GET | /offers | List offers |
POST | /offers | Create offer |
PUT | /offers/:id | Update offer |
DELETE | /offers/:id | Delete offer |
| Domains | ||
GET | /domains | List domains |
POST | /domains | Add domain |
PUT | /domains/:id | Update domain |
DELETE | /domains/:id | Delete domain |
POST | /domains/:id/setup-ssl | Provision SSL certificate |
POST | /domains/:id/check-health | Run on-demand health check |
| Landing Pages | ||
GET | /landing-pages | List landing pages |
POST | /landing-pages | Create landing page |
POST | /landing-pages/clone-url | Clone page from URL (downloads assets locally) |
PUT | /landing-pages/:id | Update landing page |
DELETE | /landing-pages/:id | Delete landing page |
POST | /landing-pages/:id/duplicate | Duplicate landing page |
POST | /landing-pages/:id/reclone | Re-clone from original source URL |
GET | /landing-pages/:id/assets | Get asset file count and disk usage |
DELETE | /landing-pages/:id/assets | Clear downloaded assets |
| Reports | ||
POST | /reports/query | Run analytics query |
GET | /reports/dashboard | Dashboard stats |
GET | /reports/click-log | Raw click log |
| Conversions | ||
GET | /conversions | List conversions |
All list endpoints support ?page=1&per_page=50&sort_by=id&sort_dir=desc&search=term query parameters.
Postback URL
Configure this postback URL in your affiliate network to track conversions:
https://track.yourdomain.com/postback?click_id=REPLACE&payout=REPLACE&status=approvedReplace REPLACE with your network's macros for click ID and payout.
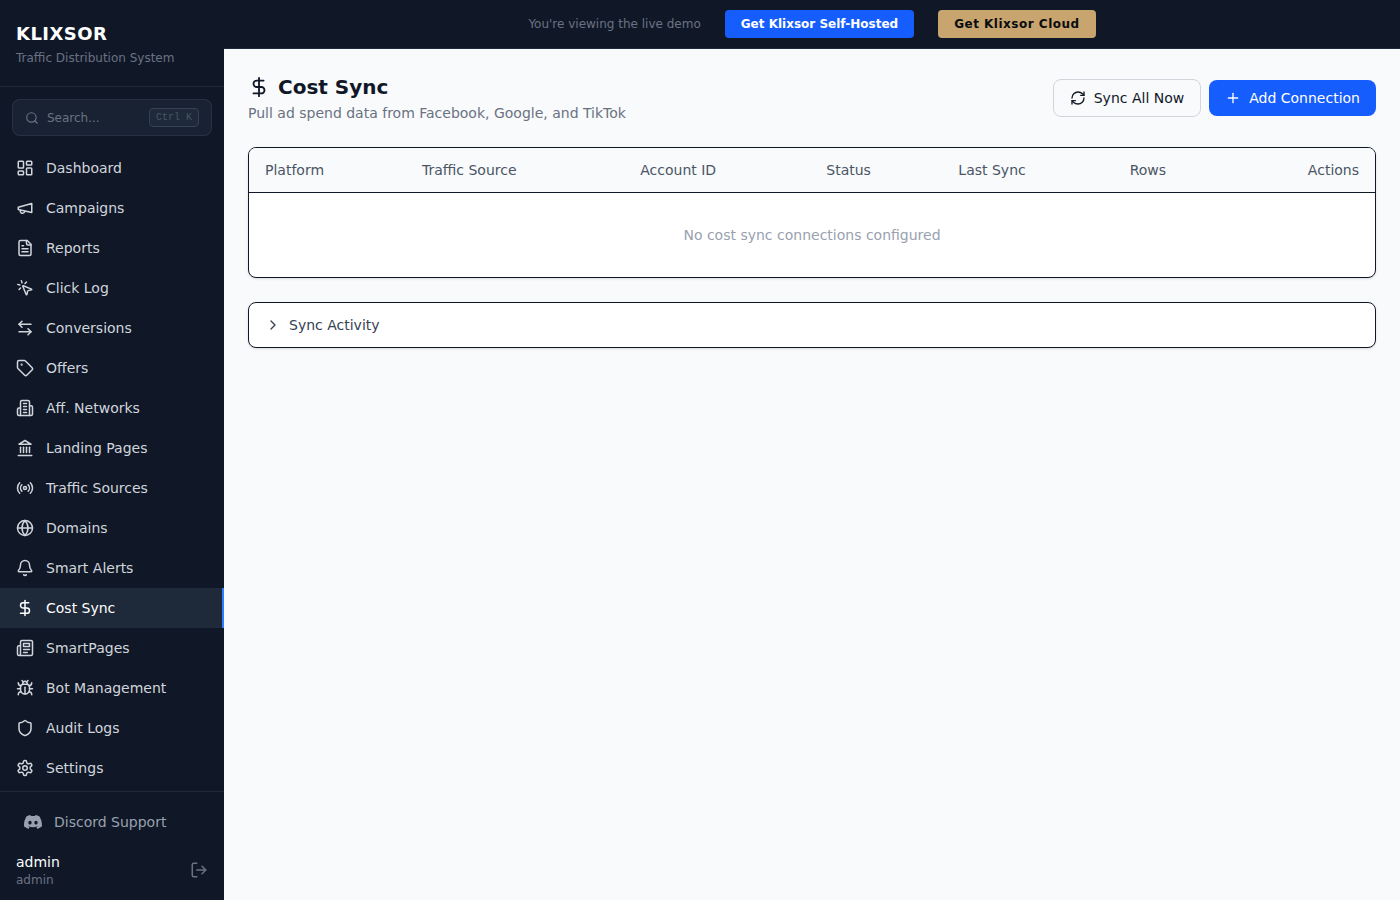
Cost Sync — Ad Network Spend Data
Cost Sync pulls advertising spend data from your ad network accounts (Facebook/Meta, Google Ads, TikTok Ads) directly into Klixsor. This enables true ROI and profit calculations by combining your actual ad spend with Klixsor's conversion revenue data.
The Cost Sync page showing connections to ad network accounts
Why Use Cost Sync?
Without Cost Sync, Klixsor calculates cost from the cost parameter in your tracking URLs (e.g., &cost={cost_per_click}). This works well for per-click cost tracking, but has limitations:
- Not all traffic sources pass cost in the URL
- URL-based cost may not match what the ad network actually charged
- No impression data — you can't calculate CPM or CTR from the ad network's perspective
- No way to see total account spend for campaigns not yet linked to Klixsor
Cost Sync solves all of these by pulling the actual spend directly from the ad network's reporting API.
Supported Platforms
| Platform | API Used | Data Pulled |
|---|---|---|
| Meta / Facebook | Marketing API v21.0 (Insights) | Campaign, Ad Set, Ad level: spend, impressions, clicks |
| Google Ads | Google Ads API v17 (SearchStream) | Campaign, Ad Group level: cost, impressions, clicks |
| TikTok | TikTok Marketing API v1.3 (Reports) | Campaign, Ad Group, Ad level: spend, impressions, clicks |
Prerequisites
Before setting up Cost Sync, you need:
1. A Traffic Source with CAPI Configured
Cost Sync reuses the API tokens you already configured for Conversion API (CAPI) on your traffic source. If you haven't set up CAPI yet:
- Go to Traffic Sources and create or edit a source (e.g., "Facebook Ads")
- Select the matching template (Facebook Ads, Google Ads, or TikTok Ads)
- Expand the Conversion API (CAPI) section
- Enable CAPI and enter your platform credentials (access tokens, pixel IDs, etc.)
- Save the traffic source
2. Your Ad Account ID
You'll need your ad account ID from each platform:
| Platform | Account ID Format | Where to Find It |
|---|---|---|
| Meta / Facebook | act_123456789 | Facebook Business Manager → Business Settings → Ad Accounts. Include the act_ prefix. |
| Google Ads | 1234567890 | Google Ads dashboard → top-right corner shows your account number (remove dashes). This is your Customer ID. |
| TikTok | 1234567890 | TikTok Ads Manager → click your profile icon → Advertiser ID. |
3. Required API Tokens by Platform
| Platform | Required Tokens (set in Traffic Source CAPI config) |
|---|---|
| Meta | Access Token — A system user token or long-lived user token with ads_read permission. Generate in Business Manager → System Users. |
| Google Ads | Refresh Token, Client ID, Client Secret, Developer Token, Customer ID — Set up via Google Ads API credentials in your Google Cloud project. |
| TikTok | Access Token — Generate via TikTok Marketing API developer portal with Ad Account Management and Reporting scopes. |
Setting Up Cost Sync
Once your traffic source has CAPI tokens configured, setting up Cost Sync takes about 30 seconds.
Step 1: Go to Cost Sync
Click Cost Sync in the left sidebar (the $ icon).
Step 2: Add a Connection
Click the + Add Connection button. Fill in the modal:
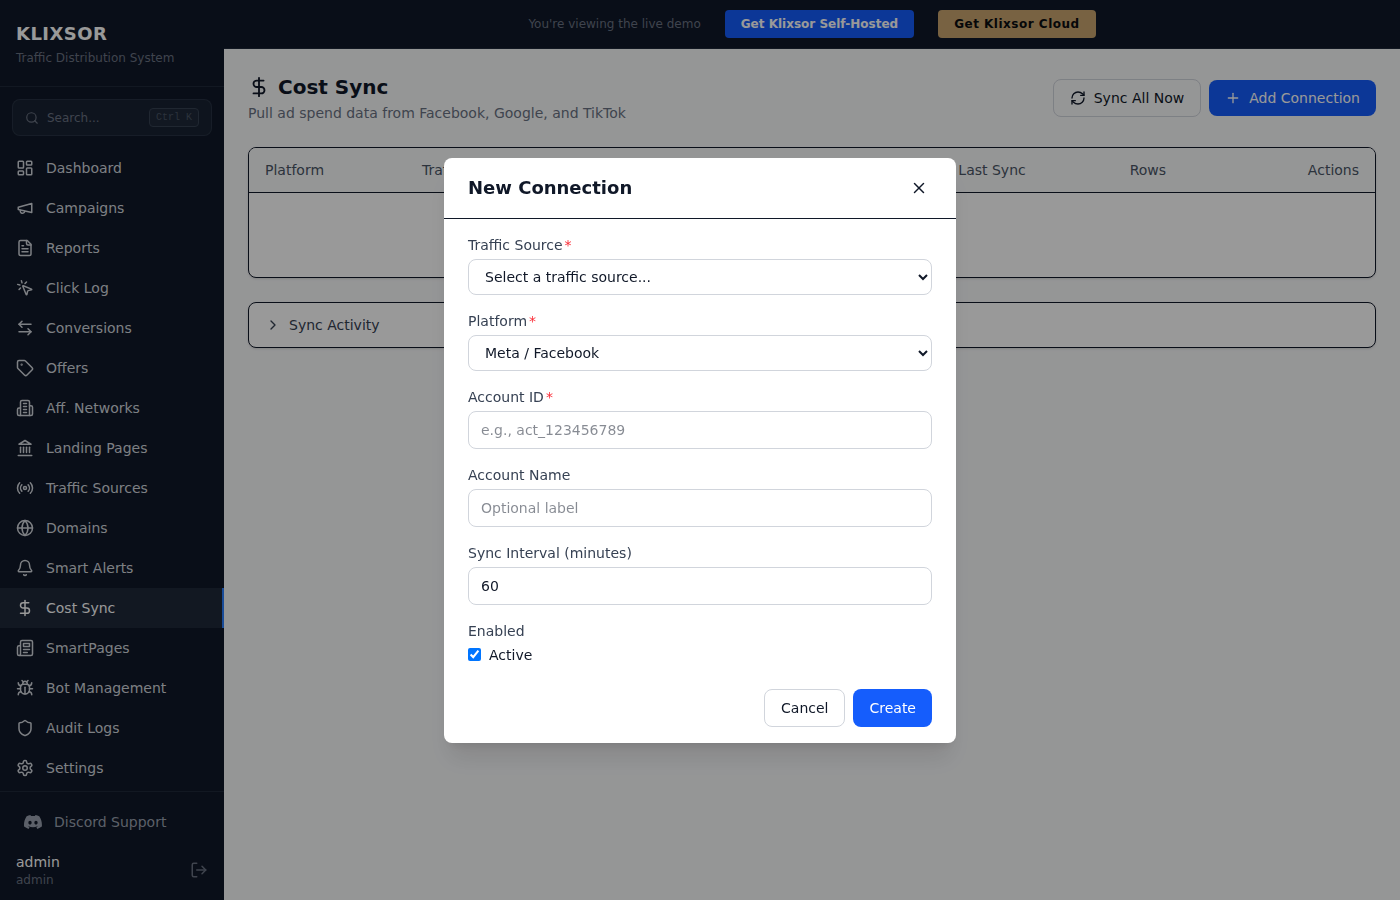
Creating a new cost sync connection for a Facebook Ads account
| Field | Description |
|---|---|
| Traffic Source | Select the traffic source that has CAPI tokens configured for this platform. Required. |
| Platform | Choose the ad platform: Meta/Facebook, Google Ads, or TikTok. Must match the CAPI config on the selected traffic source. |
| Account ID | Your ad account ID from the platform. For Facebook, include the act_ prefix. Required. |
| Account Name | Optional label for your reference (e.g., "Main FB Account" or "US Campaigns"). |
| Sync Interval | How often to pull data, in minutes. Default is 60. Minimum is 5. The worker also runs a baseline cycle every 15 minutes. |
| Enabled | Toggle the connection on/off without deleting it. |
Step 3: Verify the Sync
After creating the connection, you can:
- Click the play button (▶) in the Actions column to trigger an immediate sync
- Or click Sync All Now to sync all enabled connections
- Check the Status column — it should show a green "Success" badge
- The Rows column shows how many cost records were synced
Platform-Specific Setup
Meta / Facebook Ads
- In Traffic Sources, create a source using the "Facebook Ads" template
- In the CAPI section, enter your Meta Access Token (system user token with
ads_readpermission) - In Cost Sync, add a connection with platform "Meta / Facebook"
- Enter your Ad Account ID (format:
act_123456789)
ads_read permission to pull cost data. If you already use it for CAPI conversions, you may need to add this permission. System user tokens are recommended for long-term stability.
Google Ads
- In Traffic Sources, create a source using the "Google Ads" template
- In the CAPI section, enter your Customer ID, Developer Token, Client ID, Client Secret, and Refresh Token
- In Cost Sync, add a connection with platform "Google Ads"
- The Account ID field should match your Customer ID (digits only, no dashes)
TikTok Ads
- In Traffic Sources, create a source using the "TikTok Ads" template
- In the CAPI section, enter your TikTok Access Token
- In Cost Sync, add a connection with platform "TikTok"
- Enter your Advertiser ID as the Account ID
Monitoring & Troubleshooting
Connection Status
Each connection shows a status badge in the table:
- Never (gray) — No sync has been attempted yet. Click the play button to trigger one.
- Success (green) — Last sync completed successfully. Shows the number of rows synced.
- Error (red) — Last sync failed. Hover over or check the activity feed for the error message.
Activity Feed
Click the Sync Activity section below the table to expand the activity log. It shows timestamped entries for each sync cycle:
- Info (gray) — Normal operations like "Starting cost sync cycle" or row counts per date
- Success (green) — Completed syncs with total row counts
- Error (red) — Failed syncs with error details (e.g., invalid token, API rate limit)
Common Errors
| Error | Cause | Fix |
|---|---|---|
| "no capi_config" | The linked traffic source doesn't have CAPI configured | Edit the traffic source and set up CAPI credentials |
| "401 Unauthorized" or "Invalid token" | Access token expired or lacks permissions | Generate a new token and update the traffic source CAPI config |
| "Rate limit exceeded" | Too many API requests to the ad platform | Increase the sync interval (e.g., from 15 to 60 minutes) |
| "Account not found" | Wrong ad account ID format | Verify the Account ID format matches the platform (see Prerequisites) |
| "ClickHouse insert failed" | Database connection issue | Check that ClickHouse is running and accessible |
Using Cost Data in Reports
Once Cost Sync is pulling data, new metrics become available in Reports:
New Ad Cost Metrics
| Metric | Description |
|---|---|
| Ad Spend | Total spend reported by the ad network (from the ad_costs table) |
| Ad Impressions | Total impressions reported by the ad network |
| Ad Clicks | Total clicks reported by the ad network |
| Ad CPC | Cost per click from the ad network (Ad Spend ÷ Ad Clicks) |
| Ad CPM | Cost per thousand impressions (Ad Spend ÷ Ad Impressions × 1000) |
| Ad CTR | Click-through rate from the ad network (Ad Clicks ÷ Ad Impressions × 100) |
| True Profit | Conversion Revenue minus Ad Spend (actual profit from the ad network's perspective) |
| True ROI | (Revenue - Ad Spend) / Ad Spend × 100 — your real return on investment |
| True CPA | Ad Spend ÷ Conversions — how much the ad network actually charged per conversion |
Cost vs. Ad Spend
Klixsor now has two types of cost data. Understanding the difference is important:
| Cost (existing) | Ad Spend (new) | |
|---|---|---|
| Source | URL parameter (&cost=0.05) or campaign CPC/CPM config | Ad network reporting API (Cost Sync) |
| Granularity | Per click | Per campaign/day (aggregated by ad network) |
| Accuracy | Depends on traffic source passing correct value | Exact — matches your ad network invoice |
| Metrics | Cost, CPC, CPA, Profit, ROI | Ad Spend, Ad CPC, Ad CPM, True Profit, True ROI, True CPA |
How Matching Works
Cost Sync data is matched to your clicks using three keys:
- Traffic Source ID — the Klixsor traffic source linked to the Cost Sync connection
- Date — the day the ad spend occurred
- External Campaign ID — the
ad_campaign_idparameter from your tracking URL, matched against the campaign ID from the ad network
For matching to work correctly, make sure your tracking URLs include the ad network's campaign ID parameter (e.g., &ad_campaign_id={campaign_id}). The built-in traffic source templates (Facebook, Google, TikTok) handle this automatically via sub_id_2.